Sunday, December 11, 2011

A quick one


Not much to say, trying to blarg at you more often than not here, but its not easy with everything else going on. Plus things in my own garage are pretty stagnant at the moment, haven't made much progress on any of my poorly running bikes.

Despite my best effort however (to avoid buying more bikes), I did acquire another $100 Pinto. I know you guys on the coasts (or anywhere that isn't milwaukee, i guess) will hate me for this, but its almost hard not to buy $100 barn-fresh Pintos here. This would probably be the 7, 8, maybe 9th Pinto that has come to me in about this same condition.
From Blk Pinto 12_11


The throttle cable is ALWAYS broken, the chain is usually froze up (missing in this case), the forks are loose as hell, and the pedals are bent, but the EE-FIDDY is in great shape. No speedo, so no clue what the miles are, but the tires are original and hold air. Not too worn down either.

From Blk Pinto 12_11


It also came with 2 14mm bing carbs and a box of other fail from the previous owner trying to resurrect it. I talked to him and he wants to buy it back from me if I get it running, but the more I think about it, the more hoarder-ey I feel. I've never had one of these with snowflakes before, I usually get the 'red' orange ones with spokes. I dont really like snowflakes but for some reason I really like this little bike. Either way it will have to wait a couple weeks for me to get my dollars up enough to sort it out properly.

Speaking of getting my dollars up (a phrase borrowed from The Illustrious Miles Fox) I've been cranking out new parts like a monkey on crack lately.

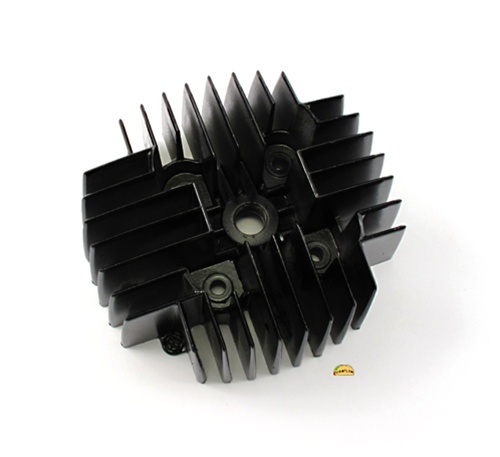
I turned a few heads for the Treats gang, the bulk of it Puch stuff, but also trying to bulk up supplies of vespa, motobecane, and there might be a debris laying around somewhere. The Metrakit 65 head I started doing 5 or so years ago is still a hot seller, and my processes (sandblasting, paint, finishing) have gotten a lot better thanks to my new machine shop and upgraded tooling. I daresay these are some of the nicest heads I've ever made.

I also finally put a bracket that has been riding around on the bottom of my sachs since, oh, 2007? into production. The final version is burly 12 ga steel and powdered in MopedFactory blue. It will let you put a Simonini Peugeot Circuit pipe on your lowly Sachs 505. Anybody want to test it on a 504? Freebeeez! The way the pipe is set up from the factory, the header is the exact same size as the nipple of the Athena Kit, but for stockers, you'll need a little shim. I'll be making those very soon so hang on to your hat.
From Sachs simo exhaust bracket


Oh yeah, what else you ask? As if all those fantastic parts that i've been slaving over isn't enough to make you happy, I went ahead and did another production run of ZA-50 Billet oil fill plugs. Why? Because I needed a couple for myself and figured while I was at it, might as well make 20 or so.
From za 50 drain plug


These new ones are, once again, better because of the improved equipment at the new shop. There is a miracle machine there called a 'speed lathe' that makes it easy for me to keep the quality control on these like 300% more consistent. The last batch I ended up throwing out about 1 in 5 due to the o-ring groove getting cut funky, but this batch came out almost perfect. They also are faster to make, but I cant drop the price people, geez they are already cheaper than the 30 year old rubber crap Puch is trying to give you... and it ain't even in stock.

oh yeah these fit in your rare as hell x-50 3 speed hand shift moped engine also, but dont bring it up, i just sold mine and it makes me a very sad panda. Oh well, on to bigger and faster things hopefully.

Thursday, December 1, 2011

A shop day, back on the Pugeot

I was able to get a day in my workshop finally after several weeks. When I started making mopeds my business, I had plenty of moped time to go around and was able to keep up on a running bike or two, my projects, etc. Now that life has gotten crazier all moped time (which is much less) goes into making parts now, and a pure, unadulterated, shop day of just dicking around and sorting things out, is a rare joy.

I cant remember where I started, but first project was Le Peugeot. This was easy stuff but frustrating/time consuming BS. When I loaned it out at the rally, somehow (this was probably happening before the rally but I didn't notice) the exhaust rapidly began disintegrating into its component parts. This is that stupid pipe that started life as a 'faco' and is now mostly hand fabricated with only a section of the chamber original.

From Puegeot


The flange that screws into the cylinder broke off, so i welded in the higher-quality stock peugeot flange and a section of pipe, along with the peugeot stock nut which was much nicer. This held for most of the summer, but finally let go sometime during the rally. My apologies to Seth for the bum-ass loaner bike. The wimpy little sheet metal bracket under the engine disintegrated even after being welded closed, and it didn't take long for the flange/header to break and let go.

So yeah, i welded that back together. The handlebars that I started replacing a couple weeks ago finally got new longer cables that aren't frayed and corroded, and now the handlebars aren't bent and hastily welded back together. Also a much more comfortable angle.

From Puegeot


True to form, she fired up on the second kick after i dumped a carb-bowl full of varnish gas out. My bone head brother stole my good fat OEM peugeot belt and i was forced to use his rolled-over shredded to heck belt of unknown provenance. The bike was a totally new animal with the thinner belt, definitely helped even though it was slipping like crazy.

From Puegeot


Rode to work yesterday and made it, although i still cant figure out this top end 4-stroking/misfire thing. I've tried different timing, different jetting, different plugs, and i'm still totally flummoxed. It just feels gutless, like bad timing, on the top end, then when you go down a hill or pick up speed around 37-38 mph it starts to four-stroke like crazy and slow down.

The intake is still stock and who knows what is going on with that pipe, so either of those could be causing the flow to choke abruptly. In the next couple weeks when i get paid for a few things (most notably selling my precious X-50 motor) i'll invest in one of those malossi SHA intakes and put the 16 SHA that came off my 'ella' maxi on to the Peugeot and see if we cant get her blasting properly. Also the variator still needs attending to, so that will probably happen all at once.

Friday, November 11, 2011

Two steps forward, four steps back

I'm not quite ready to go Mike Ness on the whitehouse or anything, but these lousy A35 manifolds were a bit of a set back. In addition to taking way too much effort to make and costing me a ton to set up all the jigs and such, they have been somewhat problematic in that they are the first product I've made like this. There is a good reason nobody else makes these things!

Version 1
From Moped Factory Products


The first batch of 10 had some quality control issues first of all, the welds left something to be desired visually (they were airtight- tig welded inside) and the powdercoating was a bit spotty. Definitely not up to Moped Factory standards. I was in too much of a rush and sent them out anyway and right away one of my product crash testers got back to me and said that there was a placement error, on the A35 frame the old intake (ver 2) went right into the front side cover bracket. The bike I tested them on was an A3 and slightly different in that area.

Version 2
From Moped Factory Products


So last weekend, the forward progress was interrupted to re-make the offending manifolds, with what I hope will be a more universal and all-around better design. Version 3 of the manifold is less trick, bringing the carb out farther from the frame, and on the right side this time (starboard), instead of the port side. As much as I like designs that allow you to keep things tucked in neatly, the Tomos engine and frame layout doesn't give much of an option for that. Perhaps in version 4 I'll use an actual a35 frame and make it specific to that model, in the mean time I've got something that will get the job done and should be a bit more universal for all the hackers and wierdos out there putting these things on Puchs, Batavus (more regarding this soon!), etc.

Version 3
From Moped Factory Products


The new models are welded with some tricky machine shop magic to give much better looking welds. Mig, not tig, which has certain advantages to the manufacturing process. Mostly that its faster and doesn't heat up the plate as much, so it wont warp as badly, and it looks so nice.

From Moped Factory Products


And another pic to show clearance:
From Moped Factory Products


This is finals week coming up here, so I'm working on a pile of final reports and crap, but next week I'll be hard at it getting some more exciting new products out and I'll mock up a puch frame to make sure this intake clears... take some pictures.

If all goes well, hopefully I can get some work done on some of my own projects, might make for more interesting blogging.

Friday, November 4, 2011

Ho-lee-crap

All I can say is ... wow. If you have even the slightest bit of gasoline in your veins, these youtube videos are stunning to see.

Tuesday, November 1, 2011

Moar parts

Had a busy weekend, finally was able to finish up a couple products I've been developing during the last few weeks.
From Moped Factory Products

It sounds kinda silly saying that, because most of you (especially if you had a machine shop at hand) could have made any of these things in a couple hours, but its totally different when you are producing things to sell. Testing, quality control, all kinds of things have to be done. A big part of what this experiment with the moped business is teaching me is the concept of 'design for manufacturability'. It means altering your design to make a product easier to produce, or more consistent to mass produce. Its the missing link often between a good product and a great product, or making a profit/not making a profit.

If you're going to stake your reputation on a product, you better be darn sure its going out the door correctly made, a big part of that is consistency. When you make one intake you can mock it up on your bike, tack it in place, bend it to fit, finish weld... when you make 10 intakes you have to make a jig to cut the tube, a jig to bend the tube, a jig to hold it while you weld. By the time you're done with all that you've spent weeks engineering a process. The good news is, it pays off in time by ensuring a high quality product and making them cheaper to mass produce. Oh yeah, I'm learning a lot as well, and as my mom always says 'education is expensive'.

The first part i'm excited about i've been making for awhile, just for my own use and for friends. These 'E50' stands- which fit all puch engines, of course- are really handy for rebuilds and for starting your engine on the bench. The originals had goobery welds on the outside, and weren't always 100% perfectly square. I made some changes to my design and managed to hide the welds, make them stronger and more accurate, and shoot some pretty blue powder on them.
From Moped Factory Products


What do you think? The blue powder was a reccommendation of my brother who is always reminding me I should work harder at getting radical. Black would have been the safe choice, but I like this blue, and now when you start seeing all my stuff coming out in blue, maybe you'll recognize moped factory products when you see them on other people's cool mopeds, or something... I'm retarded when it comes to marketing, so y'all should know that MF stuff is less than 2% hype. Boring eh? Whatever, if you want hype go buy some Coke or a pair of Nikes.

The other part that i've put a ton of time into lately... and boy have i ever... is this A35 to 16SHA intake manifold. Ever since Handybikes ran out of Daelim manifolds sometime around 2008, there has been a lot of hair-pulling by the moped community about finding a good, well fitting, 16mm SHA manifold to fit the A35. You can use that straight shot one from treats, maybe, if you have just the right carb and the gods are smiling upon you. And dont even think about changing a jet or running an air filter.
From Moped Factory Products


A guy emailed me asking if I could make him one and it got my juices flowing about this part again. I'm literally going to bleed money on these things, but they are so cool and so badly needed, consider it community service or something. It required about 10 modifications to my plasma-cut flange, to get just the right angle on the pass-through of the tube. A jig had to be made to ensure the bender would bend the tube at just the right angle, a jig was made to hold the tube and cut it at just the right angle, and the tube itself requires a machining step to put the clamp-mount spigot on the end just perfect.

After about 10 prototypes moving the carb into different locations, it ended up here. I mocked it up on an A3 so hopefully it works on A35 frames just the same. I cant exactly remember how those frames are different (if at all) but it should clear side covers and everything, so you can keep sleeper status even with a kit.

This week I'm cleaning up the garage and getting ready to put together my ZA-50 finally. This stupid thing has taken me forever, basically because I want it to be perfect and run forever. Is that too much to ask? The last ZA-50 I rebuilt had at least 20k on it before the bearings got so sloppy that I finally had to retire it. Hopefully this one with improvements like relined clutches, roller bearing crank, and higher quality bearings (I've replaced almost every single bearing in the whole engine) will allow it to run hard with a Polini for many years to come as a daily blaster.

Wednesday, October 26, 2011

central standard daylight savings time

It has been a crazy summer, too crazy to 'blog' about in fact.

My lovely girlfriend and I had a kid:
From Blogg


My brother moved in with us to go to school for industrial design
From cranks rally 11

I partied in Chicago
(photo redacted)

I made some moped parts
From Moped Factory Products


And I worked on a few projects
From Bridgestone

New Bridgestone 100GP

From Sea-Bee outboard

1948 'Sea-Bee' by Gale outboard, totally rebuilt and restored

plus lots more!

I'll try to start writing up some of my summer projects here and there when i have time. The outboard just got finished yesterday, so if the glue is all dry i'll probably start it up tonight and post up that restoration process soon.

The red sachs 'sally' has also come a long way, but it really makes me depressed with the constant not-running-ness, and now its leaking out all its trans oil, so that one might be awhile.

There is a really nice Polini ZA50 in my garage also on the cusp of going back together with lots of custom goodies. I'll be taking pictures of that as it goes together and posting it up as well.

Most of my moped time has been going into Moped Factory lately, building the product base and expanding our offerings, plus keeping up with demand. More good stuff on that front is coming also.

Wednesday, May 11, 2011

Peugeot, finally

If you're a compulsive moped tinkerer such as myself (and why would you be reading this blog if you aren't one?) you probably have had periods in your life where you were forced to daily-drive a bike that just isn't right. For me that period was this entire winter. I rely on my bikes for 365-days-a-year transport to school and work, so its pretty frustrating when my daily driver isn't sorted out, and having my workshop way the heck on the north side, without a station wagon or truck to move mopeds in, this winter has been very frustrating indeed. The poor little Pug has spent most of the winter maligned, and limping along way out-of-tune.

Since this little green 103 is my first foray into Peugeot tuning, there have been some speed bumps this winter getting the old girl running just right. Since it is an ongoing project, and pretty much the only thing i'm doing that I can talk about, I've been whining on here about the trials and tribulations encountered while setting it up.

So, it is after a ton of mucking around that I am so happy to report that this bike is finally sorted out and will be receiving a 'cranks' headlight sticker, as it is finally worthy.

About 2 weeks ago, I forced open a hole in my schedule and stopped by Blaze's garage, which is about 1/3 the distance to my workshop, and he has the Pug puller set. I was concerned that the last time i put the flywheel on, i clocked it in the wrong position. I removed the flywheel and reinstalled it, started up the bike, and was very confused by the fact that the pedals were spinning vigorously. D'oh! Put the damn flywheel on backwards, so the engine was running in reverse. Pulled it off again and re-installed it to find that the timing marks i had on there from the first time, and i had lined up to the second time, were still dead-on.

I set the timing at 1.40 mm as accurately as possible, and took off. By the time i got home, i was seeing the same heat fade, loss of torque, etc. as i was before re-clocking the flywheel.

About a week ago I finally got the Peugeot head machining Jig finished and turned an extra stock head I had laying around. I swapped that on later that day, noticing a ton of carbon buildup on the piston face, cylinder head. In my experience, carbon buildup usually means too advanced timing (leading to the heat which cooks oil into carbon) and too-rich mixture (too advanced timing feels like running lean and most people richen up the jetting to try to fix it)

With the hi-comp head, i found that when cold, my torque was through the roof, but the heat fade was getting worse. It seemed pretty crazy, but my timing spec (.1 mm retarded from the stock setting) was apparently still too advanced. I finally backed off the timing to some eyeballed amount around 1.2 mm and couldn't believe the difference. The bike is now pulling hard all the way up to top speed, which still feels a bit lacking, but that could be due to variator tuning, worn-out-after-a-harsh-winter-outdoors wheel and pulley bearings, or the restriction still present in the un-ported intake manifold.

Also, now that the timing is adjusted properly i should be able to dial back at least 5-6 jet sizes in the 14mm bing. It isn't four stroking right now but the plug is dark and sooty. We'll see what that plug looks like after a few miles with the correct tuning, then adjust and hopefully realize some performance gains from the right setup.

I just saw someone had posted the transcription of Jenning's chapter on spark plug selection and timing advice. Great advice and a must-read for any up and coming tuners. Personally I think that Jennings book is pure gold and a a great place to start for anyone who wants to get into 2-stroke tuning, but that chapter is especially good. Its pretty crazy when a long period of trial and error prove exactly what Gordon wrote over 30 years ago, to the letter.