If you have ever bought a real SHA along with a few small screws and some jets you have probably had the same feeling I have had... you come home knowing your treats will be there, but nothing on your doorstep. You look in your mailbox and there at the very bottom is a tiny envelope which you open and spread out on your kitchen table. It looks like the proverbial handful of magic beans, a puny little garbage carb and a few trinkets and your heart sinks 'I paid 100 bucks for THIS?!'
I call it 'Del-pression' and it can now be cured. THIS fine DAKAR clone carburetor is the solution.
The finish is great... some of the casting is chunkier than the Del SHA but in a good way, more material where you want it. The bowl is metal, the top is metal, it has a real o-ring gasket, the slide is metal, the fuel fill banjo is metal, and best of all that glorious mid-range jetting needle.
These are so much nicer than 'real' SHA's and they can actually be tuned without a divining rod, handful of chicken bones, and a left-turn screwdriver.
They come with the 19mm shim you will need for your peugeot malossi intake, puch intake or just about any other intake (some tomos take 18mm don't know why? you can use a open end wrench to measure the intake size before you buy it if you don't have a fancy calipers or measurin' stick)
Seriously though, cant say enough good things about this little buddy. Drawbacks? Hmm if you are putting it on a peugeot you can't get at the adjustment screw. Not as bad as a dellorto which doesn't even have one... so there is that!
I dunno why this is even a discussion, huh? Its like half the price and better. If you want a bigger carb buy a mikuni or an oko, seriously throw that Dellorto junk away man, its obsolete!
Monday, April 13, 2015
Tuesday, September 16, 2014
Build your own 'free' pallet shed
Hey, woah, yeah its been a while hasn't it?
My storage situation has become dire. I'm up to 15 or 16 motos and peds that are complete, probably 5 or 6 more in pieces, and everything is jammed into a small one car garage. Don't get me wrong, i'm pretty happy with my current shop situation, best shop setup I've had in years, but the excess inventory has been getting in my way and the 5 or 6 bikes out back in 'cold storage' under a tarp have been getting surface rust and bugs and crap all up in them, which sucks. Every time i want to work on something i have to push 2-3 bikes out and on Saturday it was raining and i couldn't move around the shop... I finally got pissed enough to do something about it.
So i've been planning out this little 'shed' for awhile. It took me about 4 or 5 hours to build and cost exactly $0. Even if you went out and paid real money for all the hardware store type parts, you could still get it done for $20 or so.
Ever since i was in high school and got my first truck i've been building stuff out of pallets. They are sturdy and work great for all sorts of structures. Shelves, buildings, decks, tree forts, Best part they are free.
The first step in building anything out of pallets is to find a good source of pallets. I've been lucky to always have an ample supply anywhere i've worked. The best places to find pallets are people who regularly take large shipments of things and break them up into small shipments. Construction or home improvement stores are great, but sometimes they are sneaky and hide their pallets or return them to the manufacturer. A wholesale building supply place is likely to have the extra long pallets, because they ship things like roofing panels and siding on them. The long pallets are the best kind.
What you want to find are pallets that are all the same size. You might find one beauty that is huge, but ultimately its easier to work with a bunch of same-sized pallets, or say, all your 'wall' pallets are one size and your 'roof' pallets are another size.
It is ALWAYS easier and cheaper to find the right size pallets than it is to modify them or buy extra wood to make odd-sized pallets work. Thats the first rule of pallet construction...pallets are free so if you can save time/money by wasting pallets, always sacrifice the pallets.
The pallet shed that i'll show you how to build here is by all means not the best, cheapest, or most awesome thing you could build. It is however super easy to build and it fit my needs. You could spend twice as much time on it and make it really awesome, walls and doors, etc. For someone who needs to store 4-5 mopeds or motos along side an apartment building or rental house, its a pretty simple basic structure you can build in a couple hours with minimal tools and no skills at all.
Here are the tools I used. The screws are 2" and 3" and despite the 'store bought' boxes they are actually re-used screws i salvaged from a pallet shelf i built in my old shop. You could use nails, or a nail gun if you're REALLY fancy, but for a rental house the screws are nice so you can take it apart when you move. You can use a bowsaw, chainsaw, or sawzall if you want, but you should only have to make a few cuts so the hand saw in my case took less time than getting out an extension cord.
The level is kinda fancy, but i like my roofs to drain water in a predictable fashion, and you want to make sure the legs are up and down straight so it doesn't tip over.

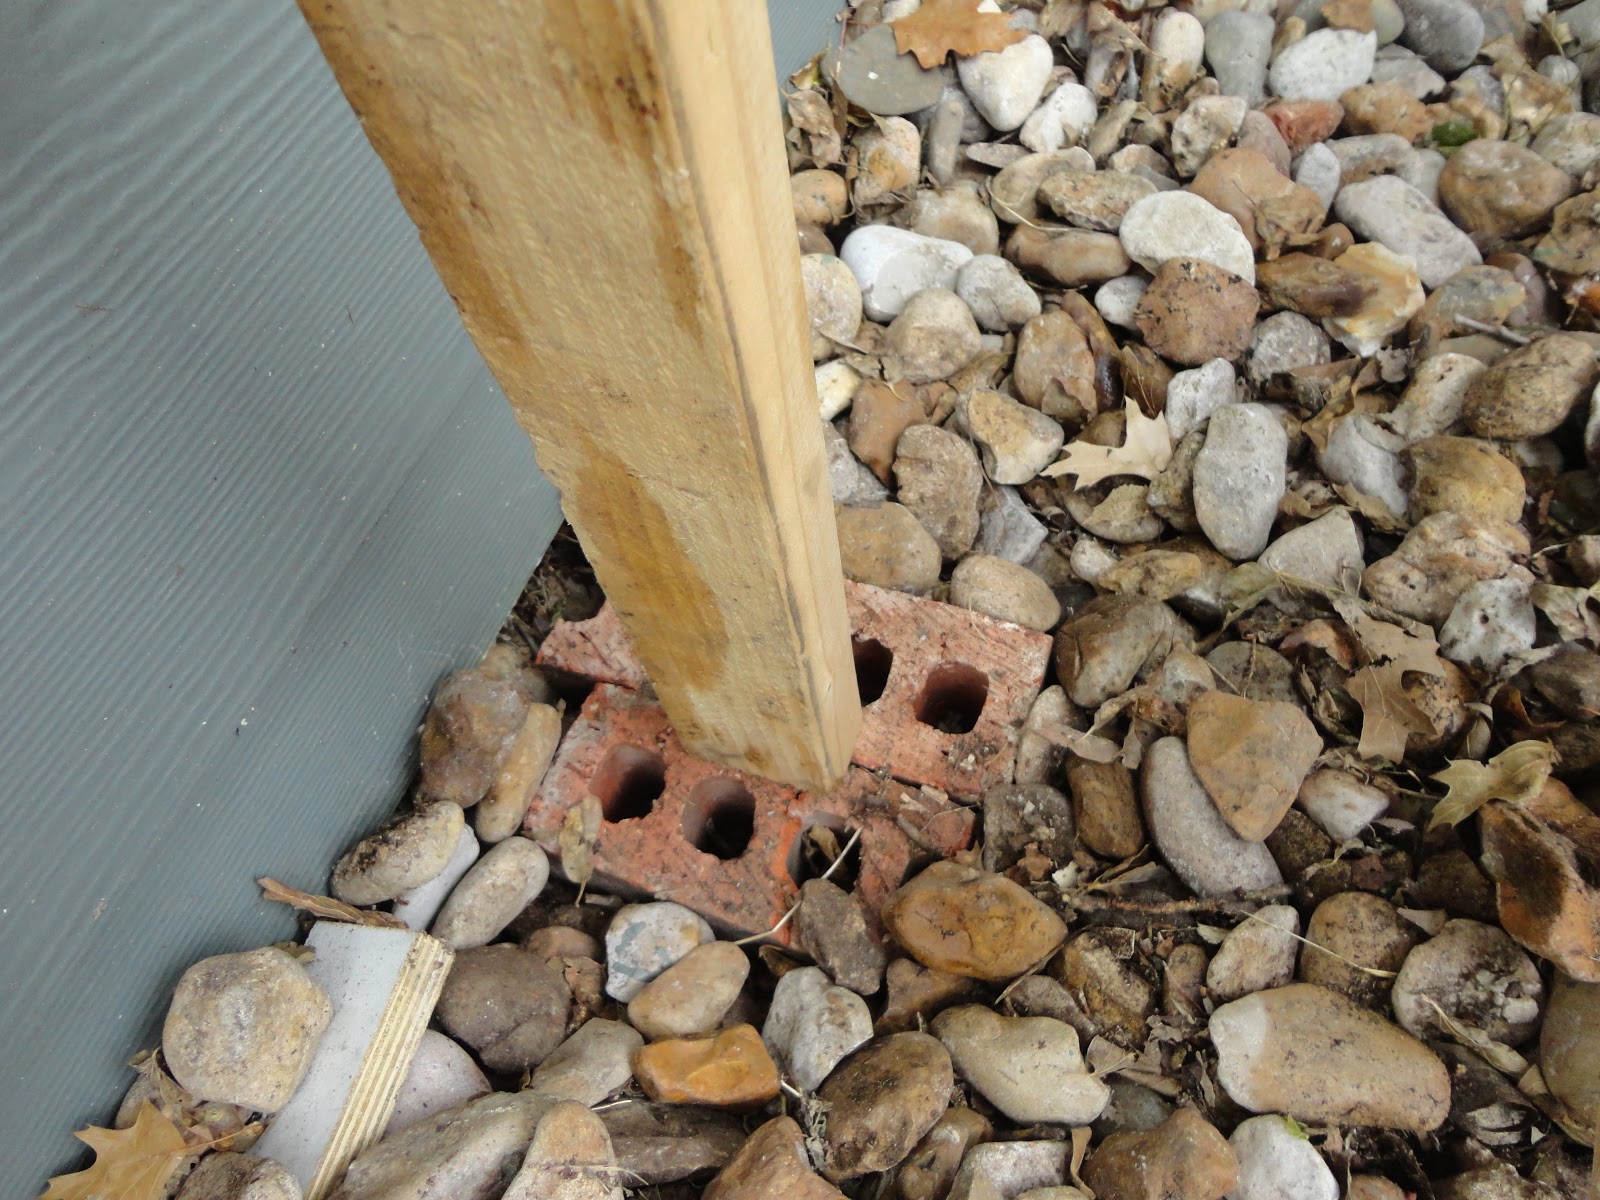
The first thing i did was measure the pallets and figure out where my legs would land. I dug down to hard dirt and laid out these bricks to provide A) a good footing and B) keep the wood legs out of the mud. If water gets into this soft junky pine wood, it will rot within a couple weeks. If you want to get all pro about this, you can use some 1-gallon ice cream buckets and redi-mix concrete to actually pour little footings. Scrap pieces of broken up concrete are really good for this too!
I used the big hammer up there and a 2x4 scrap to pound the footings down so they settle flat.
I broke my cardinal rule. I had 3 pallets that were similar but one was slightly longer than the others. No big deal. I lined them all up on a couple long 2x4's and screwed them together with the un-cut edge all lined up. I screwed the adjacent runners of the pallets into each other. This is where the c-clamp comes in handy, the pallets are all warped to hell, so I had to pull them into alignment.
This is nice because it straightens everything out and if you have pallets with cracks or knots in them it strengthens them by doubling up on the runners.

I screwed down a long 2x4 stringer to the ends of all the pallets. The 2x4's that I used for this were all collected from the dumpster at work over the last couple months. Worst case scenario, you go out buy yourself some 2x4's, they are cheap. You could probably disassemble enough pallets to get the wood but that is a lot of screwing around. Lots of construction sites throw out 2x4's you can salvage.


This picture doesn't show it well, but i had to do some creative tweaking to get the ends to all line up perfecto, and pull the warpy 2x4 into alignment.


The next part was pretty easy, I had grabbed a pallet with really long 4x4 stringers just to get those big 'legs. I figured the outer legs would be most important as the whole structure would be kinda tipped into them so they bear the most weight. I disassembled that pallet, and slipped those legs through the slats on the inside of the runners.
Then i adjusted my stilts so the roof would be at the right angle, and screwed in the big legs.
I attached 2 more 2x4's to hold the legs together, then i removed the hokey angle braces.
It was time for the Packer game, so I threw a tarp over the roof and threw my bikes underneath.

So as it sits, it is pretty sturdy. There are a lot of big screws keeping it from going parallelogram on me and collapsing, but its not strong enough for my tastes.
Later this week, i'll add some diagonal bracing across the front and back, and maybe add a diagonal brace on each side.
I'm currently on the lookout for some metal or plastic roofing panels to finish the roof. I'll cut the 4x4 posts off even with the roof and lay that over them. Its important when you build something like this to keep all the support beams inside the edge of the roof. If you dont, and water drips off a corner and runs down onto some beams, it will rot them really quick and weaken the wood where your screws attach.
Anyhow, thats just a quick primer on building your very own moped lean-to out of pallets. If you have a buddy help you, you could probably get it done in less than 2 hours. I'll post back when i get some walls on the side of this thing, and when i find some nice roofing material to finish it off, but the tarp or poly film roof is plenty good and i've used that in the past.
The most important thing for storing mopeds is just making sure that water doesn't collect underneath them, and making sure that there is enough air flow to ventilate and dry them out when its not raining.
My storage situation has become dire. I'm up to 15 or 16 motos and peds that are complete, probably 5 or 6 more in pieces, and everything is jammed into a small one car garage. Don't get me wrong, i'm pretty happy with my current shop situation, best shop setup I've had in years, but the excess inventory has been getting in my way and the 5 or 6 bikes out back in 'cold storage' under a tarp have been getting surface rust and bugs and crap all up in them, which sucks. Every time i want to work on something i have to push 2-3 bikes out and on Saturday it was raining and i couldn't move around the shop... I finally got pissed enough to do something about it.
So i've been planning out this little 'shed' for awhile. It took me about 4 or 5 hours to build and cost exactly $0. Even if you went out and paid real money for all the hardware store type parts, you could still get it done for $20 or so.
Ever since i was in high school and got my first truck i've been building stuff out of pallets. They are sturdy and work great for all sorts of structures. Shelves, buildings, decks, tree forts, Best part they are free.
The first step in building anything out of pallets is to find a good source of pallets. I've been lucky to always have an ample supply anywhere i've worked. The best places to find pallets are people who regularly take large shipments of things and break them up into small shipments. Construction or home improvement stores are great, but sometimes they are sneaky and hide their pallets or return them to the manufacturer. A wholesale building supply place is likely to have the extra long pallets, because they ship things like roofing panels and siding on them. The long pallets are the best kind.
What you want to find are pallets that are all the same size. You might find one beauty that is huge, but ultimately its easier to work with a bunch of same-sized pallets, or say, all your 'wall' pallets are one size and your 'roof' pallets are another size.
It is ALWAYS easier and cheaper to find the right size pallets than it is to modify them or buy extra wood to make odd-sized pallets work. Thats the first rule of pallet construction...pallets are free so if you can save time/money by wasting pallets, always sacrifice the pallets.
The pallet shed that i'll show you how to build here is by all means not the best, cheapest, or most awesome thing you could build. It is however super easy to build and it fit my needs. You could spend twice as much time on it and make it really awesome, walls and doors, etc. For someone who needs to store 4-5 mopeds or motos along side an apartment building or rental house, its a pretty simple basic structure you can build in a couple hours with minimal tools and no skills at all.
Here are the tools I used. The screws are 2" and 3" and despite the 'store bought' boxes they are actually re-used screws i salvaged from a pallet shelf i built in my old shop. You could use nails, or a nail gun if you're REALLY fancy, but for a rental house the screws are nice so you can take it apart when you move. You can use a bowsaw, chainsaw, or sawzall if you want, but you should only have to make a few cuts so the hand saw in my case took less time than getting out an extension cord.
The level is kinda fancy, but i like my roofs to drain water in a predictable fashion, and you want to make sure the legs are up and down straight so it doesn't tip over.
The first thing i did was measure the pallets and figure out where my legs would land. I dug down to hard dirt and laid out these bricks to provide A) a good footing and B) keep the wood legs out of the mud. If water gets into this soft junky pine wood, it will rot within a couple weeks. If you want to get all pro about this, you can use some 1-gallon ice cream buckets and redi-mix concrete to actually pour little footings. Scrap pieces of broken up concrete are really good for this too!
I used the big hammer up there and a 2x4 scrap to pound the footings down so they settle flat.
I broke my cardinal rule. I had 3 pallets that were similar but one was slightly longer than the others. No big deal. I lined them all up on a couple long 2x4's and screwed them together with the un-cut edge all lined up. I screwed the adjacent runners of the pallets into each other. This is where the c-clamp comes in handy, the pallets are all warped to hell, so I had to pull them into alignment.
This is nice because it straightens everything out and if you have pallets with cracks or knots in them it strengthens them by doubling up on the runners.
I screwed down a long 2x4 stringer to the ends of all the pallets. The 2x4's that I used for this were all collected from the dumpster at work over the last couple months. Worst case scenario, you go out buy yourself some 2x4's, they are cheap. You could probably disassemble enough pallets to get the wood but that is a lot of screwing around. Lots of construction sites throw out 2x4's you can salvage.
Now that the stringer is tieing all the clean ends together you can cut off the uneven ends and attach the stringer to the other side.
This picture doesn't show it well, but i had to do some creative tweaking to get the ends to all line up perfecto, and pull the warpy 2x4 into alignment.
And then you trim the excess off the stringers, and your 'roof' is finished.
The next part was really tough to do by myself, now I know why the amish get together 20 of their strongest buddies to 'raise' a barn. I had to get the roof up on top of the legs somehow without killing myself. It took a couple minutes of puzzling, but what i finally came up with was lifting up the roof and propping it at a 45 degree angle, then i screwed on the legs at a 80 degree angle, roughly, to give the roof some pitch. I used some scrap wood from the pallets to attach diagonal braces to the legs.
The next part was tricky. Holding a support in one hand, i picked up the whole roof and hinged it upwards on the legs. It weighed 150-200 lbs so this was no small feat lifting it over my head, then balancing it precariously on the scrap 2x4. It took me a couple tries to get it right, but when it was finally perched on the stilts, i drank a beer and took a picture.
The next part was pretty easy, I had grabbed a pallet with really long 4x4 stringers just to get those big 'legs. I figured the outer legs would be most important as the whole structure would be kinda tipped into them so they bear the most weight. I disassembled that pallet, and slipped those legs through the slats on the inside of the runners.
Then i adjusted my stilts so the roof would be at the right angle, and screwed in the big legs.
I attached 2 more 2x4's to hold the legs together, then i removed the hokey angle braces.
It was time for the Packer game, so I threw a tarp over the roof and threw my bikes underneath.
So as it sits, it is pretty sturdy. There are a lot of big screws keeping it from going parallelogram on me and collapsing, but its not strong enough for my tastes.
Later this week, i'll add some diagonal bracing across the front and back, and maybe add a diagonal brace on each side.
I'm currently on the lookout for some metal or plastic roofing panels to finish the roof. I'll cut the 4x4 posts off even with the roof and lay that over them. Its important when you build something like this to keep all the support beams inside the edge of the roof. If you dont, and water drips off a corner and runs down onto some beams, it will rot them really quick and weaken the wood where your screws attach.
Anyhow, thats just a quick primer on building your very own moped lean-to out of pallets. If you have a buddy help you, you could probably get it done in less than 2 hours. I'll post back when i get some walls on the side of this thing, and when i find some nice roofing material to finish it off, but the tarp or poly film roof is plenty good and i've used that in the past.
The most important thing for storing mopeds is just making sure that water doesn't collect underneath them, and making sure that there is enough air flow to ventilate and dry them out when its not raining.
Friday, June 6, 2014
Driving the DT50
Trying to remember where I left off, I think I had torn down the DT50 and found the leaking shaft seal behind the clutch. Most of the engine was in super good condition, now that i've worked on a couple of these dirtbikes I'm even more impressed, as they get rode hard and put up wet, as they say.
First thing I did when I tore it down was tackle the top end, the paint was peeling and there was some minor corrosion. Someone was trying to fix it and had pulled the head, wrecking the gaskets, so it had no compression. I figured I'd do a proper job of it, so I pulled it all apart and took a box of grimey, crusty junk to the engine rebuilders next door for hot tanking.

Not the greatest 'before' picture but generally showing the condition of the parts.
 Back from blasting and masked for paint. The total cost for the hot tank was $40 for 7 pieces, kinda high but way worth it to get everything back totally ready for paint.

And after 3-4 light coats of VHT caliper paint. Same stuff i use on heads, amazingly tough with a nice satin finish. Unfortunately my paint curing oven wasn't set up so i couldn't bake the paint. A tiny tiny bit of chipping occured at the head gasket sealing surface and now there is a little rust there... damn. That stuff works much better when you can bake it.

Since all the bearings, crank, etc. looked great, and there was no center gasket included with the rebuild kit, and it is a vertical split case.. and I didn't want to open a whole can of suck... I didn't bother to split the main case. Plus sometimes these vertical split moto engines can require special tools to reassemble correctly and i'm not feeling that.
I did have the clutch cover off, clutch out, replaced all the clutch-side-case seals including water pump, crankshaft, kick starter, shifter, and oil pump. Re-assembled all the clutch side parts with liberal application of red loctite, and replaced all the stripped out phillips-head screws with stainless allen head cap screws.
Cheap insurance, and since Yamaha is a company that is still in business (what a rare treat!) I was able to get parts from PartZilla who took forever to ship them (I'm pretty sure they special order it in from Yamaha so it takes 2 weeks) but everything came in OEM yammie bags and was correct and complete. Very nice. Plus they have all those wierd rubber frame bits that you can't ever seem to get. And their prices were very good. All told the bill was just over $50 for all new seals and some tank dampers, and a couple oddball screw thinges.

The gasket kit came from Treatland.tv and it is an Athena brand gasket set. It was super complete-o with some bonus gaskets for different model year DT's and everything I needed, except for the oil pump gasket (which was pretty easy to fab) and the center case gasket, which, if you really need that badly you can just order from Yamaha/partzilla. The head gasket is my only gripe, the OG gasket is MLS (multiple layer steel) which lots of Jap OEM's use, especially for aluminum-on-steel applications (I.E. Mazda DOHC 4 cylinder, aluminum head on a cast iron block). The Athena gasket is a cheaper quality carbon/graphite composite thing with a steel fire ring.

I dunno a whole lot about this kinda stuff, but on the EJ25 Subaru motors, the OEM graphite composite head gaskets are trash and prone to failure, the fix is to use an MLS gasket... making me think that there is significant reason to buy the OEM head gasket, especially if you plan on doing performancey type stuff.

Not too shabby for a days' work. This is 95% complete. Main thing missing when this photo was taken is the airbox.. that was a tough one. Chad in Canada send me one along with the sidcovers. I was able to fill her up with 10-w40 moto oil and coolant and she fired right up, LITERALLY on the first kick. So cool.
Since it was already broken in, and running lean with no air box, I just let her warm up and make sure there were no leaks. Well, there were a couple leaks, the coolant temp sensor was dribbling, and 2t oil was puking all over the place because i was missing the M5 screws to hold the oil pump on.
But other than that success! Everything works as it should, adjusted brakes, and re-torqued the muffler bolts, the head bolts and the temp sensor, did a quick check to make sure everything was free and happy, and put her away.
The next couple weeks we were moving. Then my truck broke down so I got a fire under my ass to get this thing working. The truck still is running on 5/6 cylinders, but that's a different story.
I put on a new chain (420 Chain x 110 links- good to know because some places list 428x120 chain as the replacement ) Patched the front tire, put on the airbox and installed a homemade air filter cut out of window air conditioner foam sheet.
Oh what else? I dunno. Replaced quite a few little random missing screws, etc. Got the oil injector hooked up and working, but i'm still running a little oil in the gas because i don't quite trust it and there are a couple air bubbles in the line.


So yeah, its pretty fun. Still a few things to do, replace the rear brake pads, true up the rear wheel a bit better. The rear tire has a huge gash and everyone keeps saying 'hey do you know there is a huge gash in your rear tire' ... ha.. I have a gazelle to put on there but it would just be sooooo ugly.. maybe. who cares
The forks might need some oil. The clutch cable is wackadoo way too long and all mushy.
It probably needs to go up one click on the main jet and might not be the worst idea to have a front tube without 74 patches on it.
But man, does this thing GET. It will pull a pretty stupid wheelie in 1st gear (up to about 7 mph) and hop the front wheel in 2nd. It gets up to 45 real quick and eventually climbs a good bit past 50. My commute is 16 miles each way of 60 mph 4 lane slab, and it handles that surprisingly well. The little engine loves 10, 11k and just sings along quite happy. Very well balanced and zippy.
If I have more time perhaps I'll do a better write up on all the research i've had to do to find parts sources and stuff for this. Its not as well supported as the AM6 motor, but there is pretty good aftermarket for it in europe and south america.
Its kinda funny, I'm not in love with the thing and i'm not sure why. It does everything pretty well. Its basically exactly what we all want our mopeds to be, good brakes, good suspension, stable, lightweight and plenty of power clean up to 10k rpm. Yet somehow its just not as much fun as a moped. You've always got to shift, you're usually either frustrated you cant go faster, or aggravated that you are being slowed down by traffic. If you don't wind the piss out of it, it dogs shifts, and if you do wind it out you, it blasts through gears so fast you are constantly shifting.
Its tough to say really what would make it better, if anything. It would be a real blast to have a 150 lb bike with about 2x the horsepower this has, or even just a little more torque. It would be a monster with a 200cc thumper like an xr200, but as it is, its just not that great to drive.
If i end up keeping it, I'll probably paint the horrendous rattle-canned plastics in a kenny roberts yellow paint scheme, to go with the black. Maybe even throw the cheap 70cc kit on it or put a pipe on it. Hard to say. Its the kind of bike that is so close to being awesome, yet mysteriously just not that good and I can't quite put my finger on it. At this point i've got a grand total of maybe 400 bucks into it, including fluids, so its not too hard to justify keeping it, but the 1500 I could probably sell it for could buy me a couple bikes that i'm more into, so its a tough call.
First thing I did when I tore it down was tackle the top end, the paint was peeling and there was some minor corrosion. Someone was trying to fix it and had pulled the head, wrecking the gaskets, so it had no compression. I figured I'd do a proper job of it, so I pulled it all apart and took a box of grimey, crusty junk to the engine rebuilders next door for hot tanking.
Not the greatest 'before' picture but generally showing the condition of the parts.
And after 3-4 light coats of VHT caliper paint. Same stuff i use on heads, amazingly tough with a nice satin finish. Unfortunately my paint curing oven wasn't set up so i couldn't bake the paint. A tiny tiny bit of chipping occured at the head gasket sealing surface and now there is a little rust there... damn. That stuff works much better when you can bake it.
Since all the bearings, crank, etc. looked great, and there was no center gasket included with the rebuild kit, and it is a vertical split case.. and I didn't want to open a whole can of suck... I didn't bother to split the main case. Plus sometimes these vertical split moto engines can require special tools to reassemble correctly and i'm not feeling that.
I did have the clutch cover off, clutch out, replaced all the clutch-side-case seals including water pump, crankshaft, kick starter, shifter, and oil pump. Re-assembled all the clutch side parts with liberal application of red loctite, and replaced all the stripped out phillips-head screws with stainless allen head cap screws.
Cheap insurance, and since Yamaha is a company that is still in business (what a rare treat!) I was able to get parts from PartZilla who took forever to ship them (I'm pretty sure they special order it in from Yamaha so it takes 2 weeks) but everything came in OEM yammie bags and was correct and complete. Very nice. Plus they have all those wierd rubber frame bits that you can't ever seem to get. And their prices were very good. All told the bill was just over $50 for all new seals and some tank dampers, and a couple oddball screw thinges.
The gasket kit came from Treatland.tv and it is an Athena brand gasket set. It was super complete-o with some bonus gaskets for different model year DT's and everything I needed, except for the oil pump gasket (which was pretty easy to fab) and the center case gasket, which, if you really need that badly you can just order from Yamaha/partzilla. The head gasket is my only gripe, the OG gasket is MLS (multiple layer steel) which lots of Jap OEM's use, especially for aluminum-on-steel applications (I.E. Mazda DOHC 4 cylinder, aluminum head on a cast iron block). The Athena gasket is a cheaper quality carbon/graphite composite thing with a steel fire ring.
I dunno a whole lot about this kinda stuff, but on the EJ25 Subaru motors, the OEM graphite composite head gaskets are trash and prone to failure, the fix is to use an MLS gasket... making me think that there is significant reason to buy the OEM head gasket, especially if you plan on doing performancey type stuff.
Not too shabby for a days' work. This is 95% complete. Main thing missing when this photo was taken is the airbox.. that was a tough one. Chad in Canada send me one along with the sidcovers. I was able to fill her up with 10-w40 moto oil and coolant and she fired right up, LITERALLY on the first kick. So cool.
Since it was already broken in, and running lean with no air box, I just let her warm up and make sure there were no leaks. Well, there were a couple leaks, the coolant temp sensor was dribbling, and 2t oil was puking all over the place because i was missing the M5 screws to hold the oil pump on.
But other than that success! Everything works as it should, adjusted brakes, and re-torqued the muffler bolts, the head bolts and the temp sensor, did a quick check to make sure everything was free and happy, and put her away.
The next couple weeks we were moving. Then my truck broke down so I got a fire under my ass to get this thing working. The truck still is running on 5/6 cylinders, but that's a different story.
I put on a new chain (420 Chain x 110 links- good to know because some places list 428x120 chain as the replacement ) Patched the front tire, put on the airbox and installed a homemade air filter cut out of window air conditioner foam sheet.
Oh what else? I dunno. Replaced quite a few little random missing screws, etc. Got the oil injector hooked up and working, but i'm still running a little oil in the gas because i don't quite trust it and there are a couple air bubbles in the line.
So yeah, its pretty fun. Still a few things to do, replace the rear brake pads, true up the rear wheel a bit better. The rear tire has a huge gash and everyone keeps saying 'hey do you know there is a huge gash in your rear tire' ... ha.. I have a gazelle to put on there but it would just be sooooo ugly.. maybe. who cares
The forks might need some oil. The clutch cable is wackadoo way too long and all mushy.
It probably needs to go up one click on the main jet and might not be the worst idea to have a front tube without 74 patches on it.
But man, does this thing GET. It will pull a pretty stupid wheelie in 1st gear (up to about 7 mph) and hop the front wheel in 2nd. It gets up to 45 real quick and eventually climbs a good bit past 50. My commute is 16 miles each way of 60 mph 4 lane slab, and it handles that surprisingly well. The little engine loves 10, 11k and just sings along quite happy. Very well balanced and zippy.
If I have more time perhaps I'll do a better write up on all the research i've had to do to find parts sources and stuff for this. Its not as well supported as the AM6 motor, but there is pretty good aftermarket for it in europe and south america.
Its kinda funny, I'm not in love with the thing and i'm not sure why. It does everything pretty well. Its basically exactly what we all want our mopeds to be, good brakes, good suspension, stable, lightweight and plenty of power clean up to 10k rpm. Yet somehow its just not as much fun as a moped. You've always got to shift, you're usually either frustrated you cant go faster, or aggravated that you are being slowed down by traffic. If you don't wind the piss out of it, it dogs shifts, and if you do wind it out you, it blasts through gears so fast you are constantly shifting.
Its tough to say really what would make it better, if anything. It would be a real blast to have a 150 lb bike with about 2x the horsepower this has, or even just a little more torque. It would be a monster with a 200cc thumper like an xr200, but as it is, its just not that great to drive.
If i end up keeping it, I'll probably paint the horrendous rattle-canned plastics in a kenny roberts yellow paint scheme, to go with the black. Maybe even throw the cheap 70cc kit on it or put a pipe on it. Hard to say. Its the kind of bike that is so close to being awesome, yet mysteriously just not that good and I can't quite put my finger on it. At this point i've got a grand total of maybe 400 bucks into it, including fluids, so its not too hard to justify keeping it, but the 1500 I could probably sell it for could buy me a couple bikes that i'm more into, so its a tough call.
Wednesday, May 21, 2014
Peugeot stock variator tuning - a story in pictures
I did this about 3 years ago. After making some modifications to my stock Peugeot 103 to give it more top end (pipe, porting, SHA, reeds), I spent a couple hours removing, drilling, and re-installing the weights to tune it for better acceleration.
My brother at the time was running an Airsal 70 on his, with a PHBG, and was happy with 2 M6 nuts on the swingarms, I tried that and my engine didn't rev high enough to stay in the powerband.
So this is, in pictures, how I ended up tuning my stock 45 mph peugeot 103.


DONT FORGET THE RED LOCTITE WHEN YOU PUT THE SCREWS BACK IN.
IF THE SCREWS ARE KINDA STRIPPED OUT MAYBE GO AHEAD AND REPLACE THEM WITH SOME ALLEN HEADS, OK?
 |
| Stock cylinder ported, very minimal |
My brother at the time was running an Airsal 70 on his, with a PHBG, and was happy with 2 M6 nuts on the swingarms, I tried that and my engine didn't rev high enough to stay in the powerband.
So this is, in pictures, how I ended up tuning my stock 45 mph peugeot 103.
In the end, I ended up going back to a smaller hole (I had a small pile of these weights laying around to play with) for my very conservative engine. I tuned the clutch with 3 balls and 1 star spring. Having a super high clutch stall and ripping high rpms before you variate sure sounds impressive, but for a stock setup like this, all that sound and fury doesn't get you going much faster.
The lesson here is that variating too slowly and revving out of your power band is just as bad for a stock setup like this... well maybe not just as bad, but not nearly as effective.. as variating too soon.
I'm not sure if i ever did measure the small hole + rounded ears, but i'm going to guess the weight was somewhere in the neighborhood of 20.5 grams. On a higher revving setup the 2x 5/16" hole may be the ticket coming in right around 18 grams. The numbers listed on there are cumulative meaning that each mod removed weight further resulting in the posted number.
The breakdown is like this:
Stock Weight ...... 23.8g
1/4" Hole ...... -.8g
3/8" Hole ...... -2.5g
Round ears ...... -2.25g (obviously dependent on how much you grind off)
5/16" hole (est) ..... -1.75g
Obviously there is going to be some variation in where you drill the holes and how much effect they have, the ears seem like they would make the biggest difference as they are farthest from the pivot point, the hole in the base probably not so much.
Also, dont forget to check and adjust your stop to make sure you are variating fully. You don't want to stress the arms, pivots and other parts by letting the slinging weights apply constant tension (this will smash the plastic guides by the way) but you do want to let the arms push up to almost completely closing the variator. In fact push up just a hair away from fully closing the variator. I didn't take pictures of this, but as i mod my stock vario on my TSM i'll be sure to snap a few pics of this adjustment. It is super important to getting full top speed. In fact, on the TSM i'm actually thinking about modifying the cheeks for an 'overdrive' function and letting the belt actually ride up to the full limit.
The other take-away is that the stock arms are about 1/2 gram imbalanced from each other. If you don't end up using them, you shouldn't have to worry about it, but on a ripper 10k rpm setup, that 1/2 gram could be enough to shake a carb loose, crack a bracket, or even contribute to crank failure. Get out your dope scale and dial these puppies in.
DONT FORGET THE RED LOCTITE WHEN YOU PUT THE SCREWS BACK IN.
IF THE SCREWS ARE KINDA STRIPPED OUT MAYBE GO AHEAD AND REPLACE THEM WITH SOME ALLEN HEADS, OK?
Wednesday, March 26, 2014
12 Step Process of Moped Ownership
1) get a stock moped from craigslist or a garage sale
2) get it running after posting 1000 questions on MA; JUST get it running, don't fix the forks or hook up a rear brake or tail light.
3) you are now the worlds greatest genius mechanic, but your moped only goes 20, time to hit up treatland
4) buy a bunch of performance parts and start taking shit apart on your moped, chop the fender, get some club-mans or just flip over your stock handlebars, cut some wires while you're at it.
5) install the parts poorly, get them barely running, break most of them in the process
6) post on moped army about how crappy moped performance parts are
7) get your bike going 50- you are now a performance god
8) seize your bike
9) park your bike in the back of your garage or post it on craigslist for a rediculous amount of money as it 'needs some tuning but runs good, oh yeah and rear brakes still don't work'
10) buy an enduro and ride it at moped rallies
11).....
12) profit
Sunday, March 23, 2014
DT Dreamin'
Well, guys and gals, I hate to say it but fate keeps pushing me further down the rabbit hole of Yamaha Enduros... yikes!

This one came to me last Monday. I finally posted my CL100 on craigslist because, lets face it, I'm just not that into four strokes, and after moving it across the country twice I just couldn't stand pushing it around my shop and having it in the way any more. I posted it at $400 because i saw a couple other CB100 projects on craigs for 500-700$ but they weren't selling.
A guy offered me a trade for a basket case DT100... he said it was running at one point but he had gotten into a restoration and, surprise, lost interest. He already had one CB100 and was eager to take on my project. The pictures weren't good but hey, I'd rather have a 100cc 2T than 4T any day so whatever.
When he showed up, I saw this gorgeous red tank right away and I was elated. The tank alone was enough to get me a little excited.

The rest of the bike wasn't so impressive, it was mostly in a couple boxes.

We did the deal... I told him the story about how I came by the CL and he thought it was pretty funny, he was about my age and had brought this DT down from Massachussets where he was from. Said his buddy had it and they rode it around till it died, then he started the restoration project. Didn't seem too mechanically inclined, but he did have the patience and inclination to take something and sort it out piece by piece, clean it up, and do all that stuff that bores the hell out of me. Exactly what the CL project needs!
First thing I did, of course, was hook up the coil and see if i could get her to cough. The wiring harness and coil were a mess, it looked like rodents had been chewing on them. The key is missing (guy said he found it) so I wasn't sure if I'd get fire. There was no CDI box either, but 78 might have been points? I dunno, either way I was able to find the wires and get them all connected. I checked the carb and I pulled the air filter to spray some gas in there.

This is what was left of the 'air filter' ha. It looked like it had grown in there more than been made by humans. Yeesh. The whole thing was soaked with oil and the foam had completely returned to its hydrocarbon component states... a disgusting mixture of gritty, sticky and oily all at the same time.
Lucky for me, a previous owner had creatively used this wadded up piece of organic material inside the foam... Is it a coffee filter? Paper towel?
Nope... its a 3M dust mask! HA! Certainly one of the most creative homemade air filters I've ever run across!

The best part is, the celluloid material held up to many years of fuel and oil without disintegrating, and it completely kept the disintegrated foam from contaminating the carb, reeds and eventually washing through the bearings and crankcase... which would mean a total rebuild.. I had a kawasaki that happened to once, and it wasn't pretty!
The crazy thing is, this is probably what ended up with me getting this bike in the first place. I always start this process by trying to figure out what parked the bike to begin with... the original 'oh shit' moment before someone starts tearing everything down.

With the air filter out, a couple squirts of premix gas from a windex bottle (way better for your engine than starter fluid FYI) had it pop to life and even run a couple seconds. Without the exhaust it sounded very healthy!
It only took about an hour and a half to put the whole bike back together. This guy did an awesome job of putting all the screws back in their place when he removed them, but he also did a really good job of stripping out all the screws. That's OK because I've been stopping at Fastenal on my lunch breaks (its about 5 blocks from where i work) and buying a lot of their cheap stainless SHCS's which are a lot better than the ones that 'hillman' are selling these days, and they have been running 30-50 cents a pop... which is damn good for stainless.
I decided since I was starting with a box of parts, the best policy would be to first loosely assemble everything that I had, and try to put the puzzle back together. This is a process that I've gotten pretty good at, having bought a lot of bikes in boxes, and its kinda fun at the puzzle stage, especially if you are starting with something that was pretty close to an operable motorcycle before being taken apart.
Stuff like the Bridgestone, its a bit more frustrating with tons of parts missing, broken, rusty, etc. This was a lot of fun. I only finger tightened everything, so next weekend or the next time I get a chance, I'm going to tear it all back apart again, note all the bolt lengths and go shopping armed with a detailed list. This worked out almost perfect on the DT50 and the engine reassembly process went swimmingly. I almost felt like some kind of fancy factory race mechanic slapping that engine together in record time, almost exclusively using a single M5 t-handle.

So that was the first half of an epic day of mad wrenching. Very satisfying! I still have to sort out a few things, in addition to the stripped fastners, the tank needs to have the rust acid'ed out of it. The seat cover is just a hunk of vinyl wrapped around the foam and screwed into the seat pan... its pretty ugly but definitely dubs sized. The taillight is smashed, the headlight housing was cracked but i glued that with plastic welder... need to find a 6" 6v bulb.
Fork seals, blah blah, wheel bearings, tires, chain. There is a lot to do but its one of the more 'complete' projects i've taken on for awhile. Hopefully next weekend I can take some time to figure out whats missing screw wise and do the tank, maybe 2-3 weeks and she'll be on the road.
The second half of the day will take another post! The DT50 is back together and lit right up on a spritz of gas as well. She needs antifreeze and trans oil, rear tire, tube and all the weird rando stuff that is missing. Good news is tons of compression and a very healthy feeling engine. It was so cool to literally bolt the engine in, plug in two wires, and get her to fire up on the first kick! I usually get engines to start on the third or fourth kick, but very rare (and extremely satisfying) are the times when it literally fires to life on the first rotation. She's so close to streetable that its hard to believe.
My mopeds are all waiting on bearings right now. Ordered them last week after a local bearing house was a bust. Good ol' allied bearing came through for me and I should be able to put together 3 engines early next week when this bearing order comes in.
This one came to me last Monday. I finally posted my CL100 on craigslist because, lets face it, I'm just not that into four strokes, and after moving it across the country twice I just couldn't stand pushing it around my shop and having it in the way any more. I posted it at $400 because i saw a couple other CB100 projects on craigs for 500-700$ but they weren't selling.
A guy offered me a trade for a basket case DT100... he said it was running at one point but he had gotten into a restoration and, surprise, lost interest. He already had one CB100 and was eager to take on my project. The pictures weren't good but hey, I'd rather have a 100cc 2T than 4T any day so whatever.
When he showed up, I saw this gorgeous red tank right away and I was elated. The tank alone was enough to get me a little excited.
The rest of the bike wasn't so impressive, it was mostly in a couple boxes.
We did the deal... I told him the story about how I came by the CL and he thought it was pretty funny, he was about my age and had brought this DT down from Massachussets where he was from. Said his buddy had it and they rode it around till it died, then he started the restoration project. Didn't seem too mechanically inclined, but he did have the patience and inclination to take something and sort it out piece by piece, clean it up, and do all that stuff that bores the hell out of me. Exactly what the CL project needs!
First thing I did, of course, was hook up the coil and see if i could get her to cough. The wiring harness and coil were a mess, it looked like rodents had been chewing on them. The key is missing (guy said he found it) so I wasn't sure if I'd get fire. There was no CDI box either, but 78 might have been points? I dunno, either way I was able to find the wires and get them all connected. I checked the carb and I pulled the air filter to spray some gas in there.
This is what was left of the 'air filter' ha. It looked like it had grown in there more than been made by humans. Yeesh. The whole thing was soaked with oil and the foam had completely returned to its hydrocarbon component states... a disgusting mixture of gritty, sticky and oily all at the same time.
Lucky for me, a previous owner had creatively used this wadded up piece of organic material inside the foam... Is it a coffee filter? Paper towel?
Nope... its a 3M dust mask! HA! Certainly one of the most creative homemade air filters I've ever run across!
The best part is, the celluloid material held up to many years of fuel and oil without disintegrating, and it completely kept the disintegrated foam from contaminating the carb, reeds and eventually washing through the bearings and crankcase... which would mean a total rebuild.. I had a kawasaki that happened to once, and it wasn't pretty!
The crazy thing is, this is probably what ended up with me getting this bike in the first place. I always start this process by trying to figure out what parked the bike to begin with... the original 'oh shit' moment before someone starts tearing everything down.
With the air filter out, a couple squirts of premix gas from a windex bottle (way better for your engine than starter fluid FYI) had it pop to life and even run a couple seconds. Without the exhaust it sounded very healthy!
It only took about an hour and a half to put the whole bike back together. This guy did an awesome job of putting all the screws back in their place when he removed them, but he also did a really good job of stripping out all the screws. That's OK because I've been stopping at Fastenal on my lunch breaks (its about 5 blocks from where i work) and buying a lot of their cheap stainless SHCS's which are a lot better than the ones that 'hillman' are selling these days, and they have been running 30-50 cents a pop... which is damn good for stainless.
I decided since I was starting with a box of parts, the best policy would be to first loosely assemble everything that I had, and try to put the puzzle back together. This is a process that I've gotten pretty good at, having bought a lot of bikes in boxes, and its kinda fun at the puzzle stage, especially if you are starting with something that was pretty close to an operable motorcycle before being taken apart.
Stuff like the Bridgestone, its a bit more frustrating with tons of parts missing, broken, rusty, etc. This was a lot of fun. I only finger tightened everything, so next weekend or the next time I get a chance, I'm going to tear it all back apart again, note all the bolt lengths and go shopping armed with a detailed list. This worked out almost perfect on the DT50 and the engine reassembly process went swimmingly. I almost felt like some kind of fancy factory race mechanic slapping that engine together in record time, almost exclusively using a single M5 t-handle.
So that was the first half of an epic day of mad wrenching. Very satisfying! I still have to sort out a few things, in addition to the stripped fastners, the tank needs to have the rust acid'ed out of it. The seat cover is just a hunk of vinyl wrapped around the foam and screwed into the seat pan... its pretty ugly but definitely dubs sized. The taillight is smashed, the headlight housing was cracked but i glued that with plastic welder... need to find a 6" 6v bulb.
Fork seals, blah blah, wheel bearings, tires, chain. There is a lot to do but its one of the more 'complete' projects i've taken on for awhile. Hopefully next weekend I can take some time to figure out whats missing screw wise and do the tank, maybe 2-3 weeks and she'll be on the road.
The second half of the day will take another post! The DT50 is back together and lit right up on a spritz of gas as well. She needs antifreeze and trans oil, rear tire, tube and all the weird rando stuff that is missing. Good news is tons of compression and a very healthy feeling engine. It was so cool to literally bolt the engine in, plug in two wires, and get her to fire up on the first kick! I usually get engines to start on the third or fourth kick, but very rare (and extremely satisfying) are the times when it literally fires to life on the first rotation. She's so close to streetable that its hard to believe.
My mopeds are all waiting on bearings right now. Ordered them last week after a local bearing house was a bust. Good ol' allied bearing came through for me and I should be able to put together 3 engines early next week when this bearing order comes in.
Tuesday, January 28, 2014
Dirty bike'n
This one was too good to pass up. Yamaha DT50- $225.
I saw the add on craigslist Monday morning, it had been posted late Sunday night and I figured it was probably gone. I left the tab open and went about my day for 2-3 hours. I couldn't resist, finally I shot the guy an email.
He called me back on the drive home and I explained to him that I wasn't interested in Craigslist BS but I'd come get the bike tomorrow night if he didn't sell it by then. He liked the cut of my jib because he gave me first dibs to go out and pick her up.
Since it was already dark when I picked her up, I wasn't able to do much more than a cursory inspection. Didn't even get to check her out until the next day at lunch time.
Dang, this is a pretty sweet little bike.
 So at first look its just a dumb little kids dirt bike. Except that its not little, its full sized, at least moped full sized. About the same size as a TSM, bigger than a Magnum. Probably in line with your average XR100 kinda thing. I had heard of these before but I didn't know much about them, to be honest. I just had seen this thread in MA, which I had ignored. So I went back and checked it out.
It was the comment 'Cool dudes who steal lunch money ride DT.' that sold me on buying the thing.

This is where the magic happens, this little powerplant is the same one yamaha put in the RZ50 and its a balls-out fire breathing 6 speed race motor.

 The original color was sky blue, its a shame because its beautiful. Given the general level of jacked-up-ness I'd say it was really well cared for by its original owner. Probably ran great until something minor caused it to be parked. There it sat for awhile until some jerk bought it and decided he didn't like the blue. He proceeded to rattle-can it black, and loose a bunch of the body parts, rubber, and hardware. Someone fairly recently also managed to booger up a bunch of screws. Wreck the head and base gasket by opening it up.

This is the cylinder. Its in really good shape aside from the rust inside. Its a little worn, but nothing unusual. Definitely not been seized or cooked too bad. Even the rings are really nicely broken-in. The whole engine internally appears to be in great shape.

These ports are gorgeous. Seriously, like Terry Dean levels of gorgeousness here. I'm thinking a little bluffing on that bridge, a little port cleanup and maybe raise the exhaust a tiny bit. Its already maxed out on width.


This is the monoshock rear suspension. A battery is supposed to go in here, after some continued discussion on the MA performance thread, a friendly fella is gonna send me the stock airbox and some goodies he's pulling off his bike.
 Such a cute miniature cooling system, its just the bare minimum. The burp tank is made out of blow-molded polyethelyene that is ever so slightly thicker than milk jug. 80's jap motorcycle tech was so sparse and efficient.

The thermostat was missing and lots of the outer gaskets and phillips head screws were good'n trashed. Lots of black RTV silicone all over everything. Even if the previous mechanics (to use the term loosely) were able to get this to fire, it must not have ran very well at all without the thermostat in there.

The head gasket is toast. That is the primary reason for no compression. Someone obviously took it apart, didn't replace it.

I saw the add on craigslist Monday morning, it had been posted late Sunday night and I figured it was probably gone. I left the tab open and went about my day for 2-3 hours. I couldn't resist, finally I shot the guy an email.
He called me back on the drive home and I explained to him that I wasn't interested in Craigslist BS but I'd come get the bike tomorrow night if he didn't sell it by then. He liked the cut of my jib because he gave me first dibs to go out and pick her up.
Since it was already dark when I picked her up, I wasn't able to do much more than a cursory inspection. Didn't even get to check her out until the next day at lunch time.
Dang, this is a pretty sweet little bike.
It was the comment 'Cool dudes who steal lunch money ride DT.' that sold me on buying the thing.
This is where the magic happens, this little powerplant is the same one yamaha put in the RZ50 and its a balls-out fire breathing 6 speed race motor.
This is the cylinder. Its in really good shape aside from the rust inside. Its a little worn, but nothing unusual. Definitely not been seized or cooked too bad. Even the rings are really nicely broken-in. The whole engine internally appears to be in great shape.
These ports are gorgeous. Seriously, like Terry Dean levels of gorgeousness here. I'm thinking a little bluffing on that bridge, a little port cleanup and maybe raise the exhaust a tiny bit. Its already maxed out on width.
This is the monoshock rear suspension. A battery is supposed to go in here, after some continued discussion on the MA performance thread, a friendly fella is gonna send me the stock airbox and some goodies he's pulling off his bike.
The thermostat was missing and lots of the outer gaskets and phillips head screws were good'n trashed. Lots of black RTV silicone all over everything. Even if the previous mechanics (to use the term loosely) were able to get this to fire, it must not have ran very well at all without the thermostat in there.
The head gasket is toast. That is the primary reason for no compression. Someone obviously took it apart, didn't replace it.
Subscribe to:
Posts (Atom)