Thursday, December 16, 2010
Oh my gawd!
I just found this via the excellent Corpses from Hell blog.
Imagine going a buck-10 on this thing at full tilt around a board track. It brings a tear to my eye just knowing that happened at one point. Really makes the ol' grapes sag a little bit hearing that amazing engine let loose- can you even handle thinking about what it would be like to see/hear that in person? And 10 or more of them no less! No wonder America was once the most bad-ass country in the world.
Sunday, December 12, 2010
Peugeot Coil Success!
FINALLY!
After about the 4th time re-wrapping this son of a gun I finally got it to fire and damn, is this thing kickin! I'm going to re-wrap all my coils from now on. I got too carried away with the excitement of everything finally working so i completely forgot to take enough pictures but I can at least explain what happened and what i did and all that jazz.
So the first time, i did this pretty sloppy, twisted together wires a bunch of the connections, wound the core sloppily and fast just to see how things would work. I used the 'black' wire that was connected to the 'ground' of the coil as my new live wire coming out of the magneto, to keep the grommet. I attached the hot off the coil to the purple wire in the puegeot stator which goes to the points/condensor. I also unhooked the brown wire that goes to the little brown resistor thing... no idea what that does. The other side of the coil was grounded soldering the magnet wire to the tab. I also had to replace one of the phenolic circles that border the coil with a couple rounds cut from the top of a tupperware.
I attached an old italian 1 wire coil to the mounting tab on the swingarm- perfect fit! I ran a ground strap from the mounting bolts on the coil to the frame. I used a nut on the intake manifold but it would have been much easier to tie into the grounding strap that connects the engine to the frame (dark blue w/ spade connector). Might do this later if there are connection problems.
The first winding gave me about 4 ohms of resistance through the coil. I was shooting for a replica of the Puch coil by matching the diameter of the wire after winding- which is 24ga and gives 2 ohms. Like i said, this was a pretty sloppy winding job, so i pulled all the wire off and started again. It was a lot nicer job this time, and had me at 2.6 ohms but still not perfect and even-like.
At this point, i took a second and shored up all the connections, soldered everything together, and did a much more careful job of setting the points and flywheel position to get the right dwell, because i was worried that might be a problem. I checked and re-checked my resistances. Still no spark. I was getting frustrated because i cant afford gas to be driving a car all over for another week, so i tried putting a Puch coil in... that didn't go so good either, long story but its really not a very good solution to this problem at all, you have to drill the holes out pretty big to get the right air gap, and space it with washers, and its a pain to drill because its a laminate... plus the curvature of the core is wrong for the larger diameter flywheel on the puegeot.
So i bailed on that idea and went back to winding again. I took the wire off that gave me 2.6 ohm. This time i was very careful and went a lot more slowly and wrapped it nice and even. I also used a lot more tension to keep the wrappings tight and the wire straight. I started with the side with the tab (right hand looking at the stator) and soldered on the base of the wire. The center of the core had previously been wrapped with electrical tape, but in hindsight cloth tape like you put on hockey sticks might have been better, the electric tape is too mushy. You need to start with a very sturdy base to make sure the wire lays evenly or it will be all messed up. The ends are the hardest to keep even so be extra careful. Then i wrapped it clockwise holding the 'ground' end in my little drill holder magiggy.
I dont know how many wraps or how long of wire i used, sorry, i should have been paying more attention, but it ended up about 3/4" diameter. I was measuring it by the resistance.
At the end of the wrapping i slipped some shrink wrap over the hot lead and wrapped the whole shebang with a tight cover of electrical tape. The coil probably should be potted with epoxy, but seeing as this is an experiment i wanted to get it working before setting things in stone, er, epoxy.
Once everything was wired up perfect-o i replaced the flywheel, set the points, and spun it with a drill to see if it was sparking. Holy crap! The spark is like nothing i've ever seen on a points system. Super hot, making a sharp crack, and almost like a flame thing where it comes out of the wire. It can jump over 1/2" as opposed to the old ignition that could barely jump .016" spark plug gap.
Once i got the bike all back together ( I also had to fix my busted exhaust pipe flange) it fired up just by pushing the pedal by hand. Barely one turn over, cold.
I brought it home and rode it to work today, took a little bit of persuasion to get it to fire, what with it being 8 degrees out and all, but it lit up pretty easily and is running much, much better in the low end. The acceleration from a dead stop, especially under load, is amazing. The hill in front of my house that i couldn't get up before, i can now ride up from a dead stop.
This is an awesome mod, and if you have the patience to do it right it would be pretty easy, it took me 4x as long because i was being impatient and sloppy. I still have to hook up a tail light, brake light, and (probably) some sort of voltage regulator to get the whole system up to 12v spec after gutting the electronics, so i'll keep updating this post as things come along.
After about the 4th time re-wrapping this son of a gun I finally got it to fire and damn, is this thing kickin! I'm going to re-wrap all my coils from now on. I got too carried away with the excitement of everything finally working so i completely forgot to take enough pictures but I can at least explain what happened and what i did and all that jazz.
 |
| From Puegeot coil re-wrap |
So the first time, i did this pretty sloppy, twisted together wires a bunch of the connections, wound the core sloppily and fast just to see how things would work. I used the 'black' wire that was connected to the 'ground' of the coil as my new live wire coming out of the magneto, to keep the grommet. I attached the hot off the coil to the purple wire in the puegeot stator which goes to the points/condensor. I also unhooked the brown wire that goes to the little brown resistor thing... no idea what that does. The other side of the coil was grounded soldering the magnet wire to the tab. I also had to replace one of the phenolic circles that border the coil with a couple rounds cut from the top of a tupperware.
I attached an old italian 1 wire coil to the mounting tab on the swingarm- perfect fit! I ran a ground strap from the mounting bolts on the coil to the frame. I used a nut on the intake manifold but it would have been much easier to tie into the grounding strap that connects the engine to the frame (dark blue w/ spade connector). Might do this later if there are connection problems.
The first winding gave me about 4 ohms of resistance through the coil. I was shooting for a replica of the Puch coil by matching the diameter of the wire after winding- which is 24ga and gives 2 ohms. Like i said, this was a pretty sloppy winding job, so i pulled all the wire off and started again. It was a lot nicer job this time, and had me at 2.6 ohms but still not perfect and even-like.
At this point, i took a second and shored up all the connections, soldered everything together, and did a much more careful job of setting the points and flywheel position to get the right dwell, because i was worried that might be a problem. I checked and re-checked my resistances. Still no spark. I was getting frustrated because i cant afford gas to be driving a car all over for another week, so i tried putting a Puch coil in... that didn't go so good either, long story but its really not a very good solution to this problem at all, you have to drill the holes out pretty big to get the right air gap, and space it with washers, and its a pain to drill because its a laminate... plus the curvature of the core is wrong for the larger diameter flywheel on the puegeot.
So i bailed on that idea and went back to winding again. I took the wire off that gave me 2.6 ohm. This time i was very careful and went a lot more slowly and wrapped it nice and even. I also used a lot more tension to keep the wrappings tight and the wire straight. I started with the side with the tab (right hand looking at the stator) and soldered on the base of the wire. The center of the core had previously been wrapped with electrical tape, but in hindsight cloth tape like you put on hockey sticks might have been better, the electric tape is too mushy. You need to start with a very sturdy base to make sure the wire lays evenly or it will be all messed up. The ends are the hardest to keep even so be extra careful. Then i wrapped it clockwise holding the 'ground' end in my little drill holder magiggy.
 |
| From Puegeot coil re-wrap |
I dont know how many wraps or how long of wire i used, sorry, i should have been paying more attention, but it ended up about 3/4" diameter. I was measuring it by the resistance.
At the end of the wrapping i slipped some shrink wrap over the hot lead and wrapped the whole shebang with a tight cover of electrical tape. The coil probably should be potted with epoxy, but seeing as this is an experiment i wanted to get it working before setting things in stone, er, epoxy.
 |
| From Puegeot coil re-wrap |
Once everything was wired up perfect-o i replaced the flywheel, set the points, and spun it with a drill to see if it was sparking. Holy crap! The spark is like nothing i've ever seen on a points system. Super hot, making a sharp crack, and almost like a flame thing where it comes out of the wire. It can jump over 1/2" as opposed to the old ignition that could barely jump .016" spark plug gap.
Once i got the bike all back together ( I also had to fix my busted exhaust pipe flange) it fired up just by pushing the pedal by hand. Barely one turn over, cold.
I brought it home and rode it to work today, took a little bit of persuasion to get it to fire, what with it being 8 degrees out and all, but it lit up pretty easily and is running much, much better in the low end. The acceleration from a dead stop, especially under load, is amazing. The hill in front of my house that i couldn't get up before, i can now ride up from a dead stop.
This is an awesome mod, and if you have the patience to do it right it would be pretty easy, it took me 4x as long because i was being impatient and sloppy. I still have to hook up a tail light, brake light, and (probably) some sort of voltage regulator to get the whole system up to 12v spec after gutting the electronics, so i'll keep updating this post as things come along.
Friday, December 10, 2010
Peugeot coil fail
BAH! Spent the whole morning yesterday untangling a huge rats nest of magnet wire, then wrapping it onto the peugeot coil core, then installing the coil and trying to get life out of it... nothing. bummer. It has continuity and measures about 5 ohms of resistance. This seems kinda high to me, i'm shooting for basically a slightly hopped up replica of a stock puch coil which measures 2 ohms.
I talked to some EE's today at work about coil theory, i guess the EMF or whatever it is that moves electrons in the wire of the coil, will be forming a rotational force (kindof like a torque) around the axis of the core. I knew this already and it makes sense, but i hadn't thought much about it. That means that the smaller diameter of the core, the more current and less voltage, which is not what i want, i think, because i'm looking for high voltage and low current... although they are related by resistance in the HT coil primary winding. This is all very confusing.
Bottom line, i need to re wrap the coil, but this time maybe go slower and do a more orderly job of wrapping the wire. I dont think the direction matters, but who knows. I grounded one side of the wire to the core itself and ran one side to the High tension primary phase (along with points/condenser). then grounded the high tension to the motor and tried to measure VAc with the points held open. Nothing. Shoot, i would have hoped to at least see a little juice.
I really need an o-scope or maybe just a 'not 3.99 harbor freight' DMM... I'm starting to think I'm a bit out of my league with this project, but seriously, how hard can it be, its just a coil of wire around a steel core, right?
Hopefully i can do more 'spearmintin this weekend.
Tuesday, December 7, 2010
Everything all at once
So the last couple weeks have been a real mess. Not much time for moped fun, mostly moped work. I've done quite a few custom heads, and finally shipped out some one-off parts that I've been designing to see how well they work and if it is something worth putting into production, but other than that things have been super boring.
Its been probably more than a month since i was able to update this last, finals for fall quarter killed me pretty bad, then it was two weeks of working and driving all over the midwest to hang with bandits for tanks'd'giving

This guy is great... there are very few things that i would drive 16 hours to attend for 12 hours, but campfires and garage bullshitting with the bandits is always worth it. The narrow window between finals week and thanksgiving break allowed me to attend this one with a clear conscious knowing i hadn't violated my 'no rallies during school' policy that has so far kept me from getting any moped-related F's. woo-hoo!
The next weekend saw me back up in the frozen northland, visiting the family in Eau Claire. Its always good to be 'home' especially when you come from such a warm familiar hallmark-esque town such as the Eau C.
Plus 2.50 mixed drinks and $9 pitchers dont hurt. The Joynt and GI are two of my favorite bars in the world, miss them lots.
I finally got serious about ironing out the bugs in the puegeot, the cold weather has aggrivated the wierdnesses and keeping it outside really hasn't been very good for it. I finally pulled the coil out last weekend and cut off the windings, so now i'm committed to re-winding it. I got the drill-mount jig ready to go and found some 24ga magnet wire. Trying to learn something about fluxes and potentials and all that crazy physics (why is it i've had years of these classes and cant do anything practical with them!) right now to have a better idea of how much to wrap. The 'more is more' school of thought has occurred to me, but i really need this thing to get me to and from work so i want to get it right the first time. Walking/biking/bumming rides from the GF is getting old quick.
I've also been thinking a lot lately about needles and atomizers and bing carbs designed for piston port engines. I've modded the needles a little bit to make up for porting stock cylinders, but i've never ran a bing on a reed motor. It could be some of the wierdness i'm experiencing is related to all that atomizer/needle business being all wrong. I gotta get the coil fixed to be able to tell though.
Also, the stupid pipe which has been cracked and poorly spot welded onto the nut itself for 3 months now... gotta seal that up. machined a little adapter thing that will weld to the old pipe and give it a nice new machined (100x stronger) lip to securely bolt into. That might take care of some problems.
Thats about it for me. oh yea cranks are official. thanks a million to everyone who voted for us, hopefully we wont embarass y'all by acting like a bunch of nerds. oh wait we ride mopeds, why is that cool again? also, does anybody besides a handful of members on the coasts who are in MA for strictly social reasons, really care whether or not mopeds are cool? I'm happy with the members forum joking about us being the 'kids at the magic table' of moped army. I think moped army should be about the kids at the magic table. I wasn't really one of them because i have no patience for card games but i've been to my share of drug fueled LAN parties and we were having hella more fun in high school than the 'drunk-in-a-backseat-trying-to-feel-up-a-passed-out-cheerleader' set.
And while i'm ranting:
Also, Four... anyone who is bitching should blame the lawyers and politicians who give them power to sue over stupid things like underage people drinking way too much and shooting themselves in the head. Thats what killed four, not the governments or alcohol control boards, the company was afraid to sell the product because of a lawsuit and fear of more lawsuits. The same thing that happened to Sparks (RIP).
Any time you cheer lawyers 'sticking it' to big awful corporations, remember those corporations are in place because they are making a product people want. Lawn darts, hot coffee, blackouts in cans (or bottles as they have been traditionally served). Irresponsible, opportunist and unethical Lawyers screw the pooch for all of us.
Ach... i'm too hostile to be typing tonight, back to the grind.
Batavus go-fast parts are in testing, look for some cool stuff soon.
Wednesday, November 3, 2010
Good Housekeeping
2 quick things:
1) I have some heads for sale on Moped Army buy/sell
Aftermarket 'treats' Hi comp 50 and 70, $25 shipped. The 50 is in perfect cond. The 70 was a little beat up but i re-faced it on the lathe.
Batavus M48 hi comp 50 cc. I think i decked this about .025". They can go a lot further, but this is definitely a noticeable gain especially on the upper midrange where these things have no power whatsoever.
#B) Thanks so much to everyone voting for the Cranks this round of MA branch review. Two handsome and fabulous Mosquito Fleeters even put us in their blogs. The warm fuzzies are just flying around the interwebs, getting stuck in the nooks and crannies and in my butter There are a lot of REALLY AWESOME GANGS applying for MA Branch Status this year and we Cranks are so honored to have the chance to apply. Thanks for all the kind words and supports MA, hopefully we'll get in and can continue spreading the love and warm fuzzies.
See you midwest cats in louisville at thanksgiving!
Super Sketchy Brah.
Seeing as Cristophe put up some sketches of far off projects (maybe his isn't very far off) I guess its ok for me to show you what i've been doodling when i should be doing my homework.

Maybe recent posts on the forum will tip someone off as to what this is... I've been thinking a lot lately about finally building a top tank. MB5 or maybe CBR125 forks, swingarm (monoshock) wheels and a motor to make it worth it. Something I could practically and reliably ride on the highway or race on some of the local underground TT races. I love the idea of using scooter parts, especially variators so i can fix the engine. I definitely get off on the engineering and pioneering aspect of this kind of thing, and it would be a blast to build my own engine, do some finite element analysis (a class which i am taking and loving the crap out of right now) and have a crankcase CNC machined from billet. Send out for some heat treating... the works.
Who knows if anything will ever come of it, but it never hurts to dream. Maybe Project 'MOPED FACTORY PHASE 2: Return of the Profits' will net a little extra walking around money while leaving me with some spare time. Ha yeah right.
Wednesday, October 27, 2010
Ch-ch-changes
Ugh, i'm obviously not a graphic designer, and aside from being able to slang HTML reasonably well, i'm not a pro website 'make-look-gooder' kinda guy, but the colors and format and stuff on this blog are really gross and make me not want to read it myself.
so i made some changes, might actually look worse now, but who knows. I should just have a blank page up with some text, but i'm too lazy/busy to even do that.
i'm machining heads and making parts like crazy this week, trying to correct the proportion of internet mopeds to real life mopeds. hopefully by next week some new stuff will be in stock at treats, or at least re-stocked... sorry to everyone who has been waiting on goodies.
Monday, October 11, 2010
Puegeot Power!
In other words, the Peugeot is running well, finally! The last time I blarged it was way off, but turns out not so much really. Four stroking in the midrange had me dropping the needle all the way down lean. The bike was trying to tell me something was wrong because it kept puking out the throttle cable. Finally in an act of desperation I tried putting the needle medium-rich and now it is running beautifully.
I moved the timing a couple degrees off Shaw's suggestion of 15-17 BTDC, which might be wrong now giving me lousy low end, but who knows, I did port the cylinder pretty aggressively, plus I haven't tuned the clutch or the variator yet.
Here's how she's sitting right now.
The pipe clearance is dead on.
The porting was strictly 'seat of the pants'... I stayed pretty conservative because this is supposed to be getting set up for my girlfriend, but stock porting on these is pretty weak. I figure I can make up the loss of low end by tuning the clutch /variator, because right now when that clutch grabs it almost stalls the bike.
Yep yep, pretty good stuff. Gonna be gettin' smashed this week, Wednesday I have 2, 2 hour midterms that are going to crush me. I probably have at least 10-15 hours of learnin' to do by then. Maybe thursday and friday i'll finally be able to dig myself out of this hole and make some magic happen. New developments on the Moped Factory front are in the works, but i'm pretty much broke so it is making purchasing raw materials difficult/impossible.
I moved the timing a couple degrees off Shaw's suggestion of 15-17 BTDC, which might be wrong now giving me lousy low end, but who knows, I did port the cylinder pretty aggressively, plus I haven't tuned the clutch or the variator yet.
Here's how she's sitting right now.
 |
| From Puegeot |
The pipe clearance is dead on.
 |
| From Puegeot |
The porting was strictly 'seat of the pants'... I stayed pretty conservative because this is supposed to be getting set up for my girlfriend, but stock porting on these is pretty weak. I figure I can make up the loss of low end by tuning the clutch /variator, because right now when that clutch grabs it almost stalls the bike.
 |
| From Puegeot |
Yep yep, pretty good stuff. Gonna be gettin' smashed this week, Wednesday I have 2, 2 hour midterms that are going to crush me. I probably have at least 10-15 hours of learnin' to do by then. Maybe thursday and friday i'll finally be able to dig myself out of this hole and make some magic happen. New developments on the Moped Factory front are in the works, but i'm pretty much broke so it is making purchasing raw materials difficult/impossible.
Tuesday, October 5, 2010
Slavin'
School is kicking my ass.
The maxi blew out the brass bushing on the end of the crankshaft (after 15-20k miles of abuse) and for some reason i cant seem to break the counter-shaft nut off to get at it. So i've been riding the peugeot, which is running better but still really crummy. Dead spots all over the power band, very little power. I ported the cylinder a little bit just opening the exhaust and eyebrowing the transfers, which pulled up the top end but now my low end really sucks. Its jetted at about an 80, with the needle all the way lean, and running really wierd.
I think its definitely time to re-wind the ignition coil. Shaw suggested i just cut off the outer windings, which would probably work well, but i'm going to kick it up a notch while i have everything apart and re-wind it with heavier gauge wire and maybe a few more turns. Hopefully that will solve all my problems, but who knows. I'm not sure what stock compression is in these, but it feels pretty good. I might try milling the head a little bit, but its not high on my list of priorities.
I needed to take a break from homework a couple nights ago so i made this... pretty much sums up what my life has been about the last 3 or 4 weeks.
Monday, September 13, 2010
Boys of fall
 |
| From saltyfest |
I remember being a kid and really hating fall. The beginning of school, the end of summer, weather getting cold. A real drag. Lately this has been changing for me, I really have come to love fall. Dry air, a chance to wear all my snazzy sweaters and cold weather duds, and finally camping without having sweaty sleeping bag stuck to you.
 |
| From saltyfest |
Last weekend was truly the best of fall in wisconsin. SaltyFest 2 was all that makes mopeds great, with good friends, cheap booze, beautiful country riding and, oh yeah, 100s of cars getting smashed. Not enough you say? How about this FREAKIN JET CAR!
 |
| From saltyfest |
Oh yeah, its melting two cars stacked on top of each other. MELTING THEM! They dont do this in france, son! Only one country has figure 8 BUS RACING!
 |
| From saltyfest |
Figure 8 Trailer racing! Some crazy dude jumping a ford tempo off a moving ramp at like 60 miles per hour. THIS IS THE USA BABY! Where's my bruce springsteen when i get all jacked up on america 'n stuff.
(2).jpg)
Christine and 'her girls' got radical on some shots!
 |
| From saltyfest |
We drank like 20 pitchers, or maybe more like ten but it was a lot. Oh yeah, fireworks too. Super rad weekend, thanks again Salty!
Thursday, September 9, 2010
Two steps forward, four steps back
Awesome wednesday night ride last night.... well not super awesome because I'm still pretty sick, and was being kinda a party pooper, but the puegeot finally made its Wednesday debut and was cooking along pretty well, definitely keeping up with the pack. Its really hard to get a feel for how fast this bike is because it is so quiet and doesn't really rev out or have the raw torque i'm used to from my maxi. The engine is eerily quiet at full speed, which is probably somewhere in the upper 30's.
It should have a lot more in it with proper tuning. I'm also not sure what the exhaust port looks like in these things stock, but the way it dies on the top end, i wouldn't be surprised if it was pretty restricted. Seeing as most accounts have them doing about 35 all bone stock, i've probably got a fair bit of tuning to do before its running at full potential.
In other news of awesome, the Sachs is running. I spent about an hour on it yesterday. The spark was weak and intermittent so I poked around a little bit and found that the internal coil unit was way too far away from the flywheel. I popped the flywheel off and used my masking tape trick to get the coils crazy close for maximum magnetic fluxin'. There is no flywheel key in this because i got it from crazy euro kids who dont believe in that sort of thing, so the timing is kindof a guess. There are timing marks on the flywheel but who knows if its in the right place. Either way everything looks really good and its now blasting out a fat blue spark.
True to form for this awesome kit, it fires up halfway through the first kick. Even with a massive air leak due to a missing manifold bolt it popped right to life. For some reason the chain i took off it is way too short... cant imagine how that happened seeing as it should be the same exact gears and motor from 1 speed to 2 speed, but somehow i'm about 7 links short so i decided to go ahead and put the tomos rear sprocket on. At first glance these looked compatable, but trying to fit them i found the tomos mounting bolt holes are a smaller diameter pattern- crap!
Since this is a fairly important part, i dont really want to fudge it so i think i'm going to rotate the sprocket 90 degrees and drill a whole new bolt pattern using the indexing table on the mill. I might also upgrade to a slightly larger bolt (maybe SAE rather than metric) because the little cast nubs inside the hub that are supposed to hold the nut when you tighten the bolt are all ground off from having changed this sprocket many times. All they do now is prevent the use of a socket wrench to hold them.
Either way, a productive day. Not sure if i'll have time to get both the puegeot dialed in (including switching out handlebars) and finish buttoning up the sachs all in one day before Saltyfest this weekend, but it looks like this chain/sprocket thing is going to dick me... oh well, looks like i'm moving the release date on the sachs back to bombourbon run. That will give me time to design/build the ultra-luxo-cruiser long seat and modular luggage system i've been fantasizing.
Tuesday, August 17, 2010
FACO power for le peugeot

This pipe has tempted every Peugeot owner since it came up on treats and 77 a couple years ago. Its unreasonably cheap, looks like it should mount with minimal complications, and from the pictures appears to be a halfway decent shape for stock-ish bikes. The scary part is that there is almost no information. I got my first Pug a couple weeks ago, and nobody could say for sure 'I've ran this, its good' besides somebody saying Fred (all your moped are belong to us) had a couple bikes running mid 50's with them, kitted.
So after a couple days of homework, i took the plunge and invested the 45 dollars in it. When it showed up I measured it. Here are the measurements:
Faco Dimensions
It looks to be about the same as a puch proma GP, maybe closer to a Jamarcol.. never measured one. The only dimension that is really wrong is the convergent cone. This one has a sharp taper and is only 4" long. In theory, that should result in narrow powerband that shuts down abruptly, not exactly what i'm looking for on a stock bike.
The other thing i noticed right away were some suspicious-looking spot-welds right in the belly section of the pipe. Since i knew i wanted to build an integrated silencer and i wanted to re-do the convergent cone, I figured i might as well get to hackin' to see whats up with those spot welds.
I also mocked up the pipe on the bike and found out that the mounting brackets are too short. The flange wouldn't sit flat, and the belly of the pipe was hitting the little nub that holds on the flywheel cover. Might be designed for a knock-off of the puegot with a CDI stator, or something like that. Either way, it needs about 9/16" added to each of the mounting bracket arm thingies.
After chopping the pipe in half i found this:
 |
| From Pipes |
Oh man, that sucks, not only is it almost impossible to remove without chopping a huge chunk of the belly section out, but it is most certainly a major restriction. It pretty much defeats the entire purpose of an expansion chamber and turns this into a stupid looking muffler that doesn't muffle much. If I didn't care, i would probably just cut out the inside of this with a torch or something and weld the pipe back together as it was, and slap an aftermarket silencer on it, but i like skinny long pipes for stock bikes, and this looks like with a little work it could be really awesome.
So i cut out the restrictor, and lost most of the belly section of the pipe. In order to get the integrated silencer to clear pedals and stuff, i had to cock it out so i beveled the cut a bit outwards and welded in a new chunk of belly section, a bit longer than necessary. I formed a cone out of some sheetmetal for the convergent cone, and welded that to my new stinger, which was drilled for perforation. The new convergent cone is a bit longer and has a larger stinger outlet, hopefully giving the effect of a longer duration power band.
I test fit the pipe, and now the angled belly section was hitting the little nub on the stator where the rubber tab bolts on. Easy fix- put the pipe in a vise and bend the header and all the mounting tabs over, so now the pipe is tipped down a bit on the outlet side. The stock mounting brackets should do the trick now also, because i dont have to drop it down to clear that nub anymore. The muffler has to come back up to clear the 2.25" gap between the pedal and the kickstand, so I welded the cone back into the belly section tube with a slight up-kick. I'll have to put a turn-down or something on the end of the stinger to keep from greasing my rear wheel but no biggie.
I've also gone to a smaller muffler canister, 1_3/4" tube instead of 2.25 to clear the pedals a bit more easily. The sound dampening might not be as good, but it will still be better than those proma circuit exhausts.
 |
| From Pipes |
As of now, its mocked up and tacked together. I'll test-fit it tonight. I've hooked up a 14mm bing carb with a shim to the stock intake, reeds. Hopefully this will have things running well enough for tomorrow night, and we'll be able to do a little shakedown before grand rapids.
UPDATE 8/19:
Mega boner kill, Caite and I had a serious talk yesterday at lunch and decided we should probably pay the power bill instead of going to Grand Rapids. It would be fun, but both the Sachs and Puegeot are in the early stages of tuning and probably not rally-ready, we're both broke, and I have a huge backlog of work to catch up on from summer vacationing too much at the beginning of the month. Maybe if my paycheck comes in tomorrow and is huge, i'll hop in someone's van at the last second, but its doubtful.
The good news is that the pipe fits perfectly. It variates perfectly through the gap between the pedal and kickstand. The bike fired up on the first kick, and revs out like a cross between a wounded cougar and a chainsaw, but something is keeping it from idling, possibly timing, possibly something having to do with the super random assortment of bing parts that i turned into a carb. The pipe is amazingly quiet, like, quieter than a tecno estoril, quiet.
The fan wasn't working in the workshop yesterday (again) so between a kinda-iffy bing needle and lots of exhaust fumes i couldn't get things dialed in before i asphyxiated myself. Pictures and final tuning results later tonight, maybe I'll get the sachs cabled-up and assembled a bit too.
Update 8/23:
Finally got this thing running pretty well after replacing the condenser. Small job turned into 2 hours of beating on a flywheel with a hammer because i didn't have a peugeot puller. Damn. Its running a lot better, but now it seems rich. Its running a 70 jet in a 14 mm bing, which would be huge for a stock/piped puch, but its really bogging out bad on the top end. Methinks timing might be way too retarded at 1.65, or maybe it really is sucking in that much air. The variator is also pretty much useless with the current weighting because it variates way under the power band of the pipe. That needs to be fixed as well. More later
Bonus: the sachs is fully cabled and almost ready to run, the shifter cable is perfect but it keeps slipping off, i'll have to do something about that.
Update 8/24:
Awesome success last night, finally got things running perfect-o, blasting right up to a solid 25 then slowly climbing to about 35... meh, sounds like those tiny little flippy-flappies are choking me out. it four-strokes like a mother when it revs out on the stand.... yep, restricted reeds, indeed.
luckily my patron saint, blaze, lent me some nice generic black plastic reedy things, until i can get some thinner gasket paper and chop up my flap-holes. frabjulous!
maybe wednesday i can duck out of work early and finish the sachs, it is so painfully close right now. shifter, clutch and everything seem to be working good. still have to find a plug for my voltage regulator chinese scooter special, and do a tiny bit of rewiring for the 12v system. oh yeah and the pipe needs a little persuasion as well.
Wednesday, July 28, 2010
More new products!
I've been flogging the hell out of my poor little kidnapped Keebler Elves and managed to squeeze out a few new products I'm super proud of. Both should be top sellers in stock at Treatland soon.
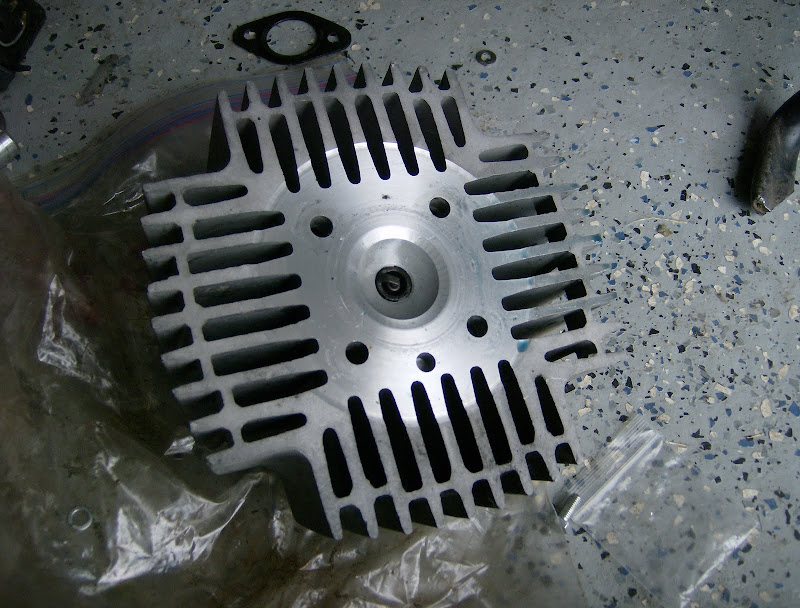
First, the 'treats reed kit' aka 'tomos alukit machined for puch exhaust flange' has a major design flaw, the deck height is about +3-4 mm from the top of the piston. Ohnoes! Low compression to be sure, which is a major bummer for a kit with awesome bottom end. I built one of these a few months back and tried a couple different things to get it in spec, but the easiest solution i found was a super-duper high compression head.
These are machined from puch Magnum heads, which fit the fins relatively close
Not perfect, but the performance increase is noticeable. Starts much better, timing is more predictable, and it feels like it has way better torque, but that's hard to claim without a dyno. Anyhow, about 4 of these are in testing and have been running great.
That build also made me re-think a big problem area for owners of magnums. Over the years I've tried a few different ways to mount maxi exhausts onto magnums, including flat brackets with bends, different shims, etc, and nothing has been satisfactory in terms of looking clean, simple, and fitting a variety of different bikes, kits, and pipes. Finally I came up with this little guy:
Simple, elegant, and the test models seem to fit most magnums. The only one that had complications, i believe was crashed because the pipe was all chewed up and the arm was bent.
First, the 'treats reed kit' aka 'tomos alukit machined for puch exhaust flange' has a major design flaw, the deck height is about +3-4 mm from the top of the piston. Ohnoes! Low compression to be sure, which is a major bummer for a kit with awesome bottom end. I built one of these a few months back and tried a couple different things to get it in spec, but the easiest solution i found was a super-duper high compression head.
 |
| From Puch 'treats' reed kit - Noah Bern |
These are machined from puch Magnum heads, which fit the fins relatively close
 |
| From Puch 'treats' reed kit - Noah Bern |
Not perfect, but the performance increase is noticeable. Starts much better, timing is more predictable, and it feels like it has way better torque, but that's hard to claim without a dyno. Anyhow, about 4 of these are in testing and have been running great.
That build also made me re-think a big problem area for owners of magnums. Over the years I've tried a few different ways to mount maxi exhausts onto magnums, including flat brackets with bends, different shims, etc, and nothing has been satisfactory in terms of looking clean, simple, and fitting a variety of different bikes, kits, and pipes. Finally I came up with this little guy:
 |
| From Puch 'treats' reed kit - Noah Bern |
Simple, elegant, and the test models seem to fit most magnums. The only one that had complications, i believe was crashed because the pipe was all chewed up and the arm was bent.
The final version is much more professional looking and entirely made of stainless steel and aluminum, with plated grade 5 and grade 8 fasteners. I dont have a picture handy, but there will be one up on treatland when they get them in.
Thursday, June 17, 2010
Honda hobbit variator 'notching'
I started making hobbit weights a few years ago for friends and such, because there is really nothing on the aftermarket, and the stock weights are hard steel, which is tough to modify, and the chincy little plastic nubs on them fall off. I started with a few different metals and ended up using a very hard acetal polymer.
I have since learned other moped wizard guru types have been doing this much longer than i have, and came to the same conclusions. I've sold a few through Treatland now, of my best design and manufacturing methods, and there have been some complaints. One of the first test sets i made, had the same problem. The weight pushes out too far and gets pinched, with the sharp steel outer plate digging into the plastic and jamming it in fully variated position. Some R&D confirmed this was due to people improperly 'notching' their variators, so I made a note to doccument it the next time i did it. Peter's Blog has a ton of great info on hopping up Hobbits, including info on variator notching. You should read all of that first, but in how it directly relates to 'Moped Factory' Slick Rick Rollers, I would like to add a bit of detail.
The very important first step in the process is carefully measuring a line around the variator 10 mm from the outside edge. I've done this with a caliper, but if you dont have one a wrench might work well. the exact number isn't super precise (+/- .2 maybe) but making sure its even will keep things balanced and make sure it variates precisely.
Tape off the line so you can see it and make sure its dead-on. Then get your dremel cut-off wheel out and start cutting just above the taped edge, along where the roller 'track' goes through.
Next, cut the rest of the window out, along the edges of the roller 'track'. I use the hacksaw because its way faster than the stupid dremel wheels, but maybe you're turbo lazy or something. Either way, cut that out of there.
You will probably be left with a little material in the corners holding it in, a quick tap tap taparooo with the hammer will bust those chunks out.
Before:
After:
This is what it should look like from the inside. Note the fact that the cut edge sticks above the top of the roller track by about 3 mm. This is about the thickness of the cut area... coincidence? i think not!
Now you just take your grinding bit and extend the ramp through the wall of the variator.
The key is that you aren't grinding down the original ramp at all, just extending it. What you dont want to do is cut off flush with the top edge of the ramp, and then grind it down, you are changing the clearance between the two ramp surfaces, and now the rollers dont fit. Maybe i'll do a diagram of this later.
When you're finished it should look like this: (or maybe even prettier, if you want to go nuts with fine bits... not that important)
The key is first and foremost making sure everything is exactly symmetrical with respect to the 3 roller tracks.
For those of you who already screwed up your variators, i'll be shipping out some 'oversized' rollers as soon as i can test them. Hopefully we can save the variators.
I have since learned other moped wizard guru types have been doing this much longer than i have, and came to the same conclusions. I've sold a few through Treatland now, of my best design and manufacturing methods, and there have been some complaints. One of the first test sets i made, had the same problem. The weight pushes out too far and gets pinched, with the sharp steel outer plate digging into the plastic and jamming it in fully variated position. Some R&D confirmed this was due to people improperly 'notching' their variators, so I made a note to doccument it the next time i did it. Peter's Blog has a ton of great info on hopping up Hobbits, including info on variator notching. You should read all of that first, but in how it directly relates to 'Moped Factory' Slick Rick Rollers, I would like to add a bit of detail.
The very important first step in the process is carefully measuring a line around the variator 10 mm from the outside edge. I've done this with a caliper, but if you dont have one a wrench might work well. the exact number isn't super precise (+/- .2 maybe) but making sure its even will keep things balanced and make sure it variates precisely.
 |
| From Hobbit Vario Notch |
Tape off the line so you can see it and make sure its dead-on. Then get your dremel cut-off wheel out and start cutting just above the taped edge, along where the roller 'track' goes through.
 |
| From Hobbit Vario Notch |
Next, cut the rest of the window out, along the edges of the roller 'track'. I use the hacksaw because its way faster than the stupid dremel wheels, but maybe you're turbo lazy or something. Either way, cut that out of there.
 |
| From Hobbit Vario Notch |
You will probably be left with a little material in the corners holding it in, a quick tap tap taparooo with the hammer will bust those chunks out.
Before:
 |
| From Hobbit Vario Notch |
After:
 |
| From Hobbit Vario Notch |
This is what it should look like from the inside. Note the fact that the cut edge sticks above the top of the roller track by about 3 mm. This is about the thickness of the cut area... coincidence? i think not!
 |
| From Hobbit Vario Notch |
Now you just take your grinding bit and extend the ramp through the wall of the variator.
 |
| From Hobbit Vario Notch |
When you're finished it should look like this: (or maybe even prettier, if you want to go nuts with fine bits... not that important)
 |
| From Hobbit Vario Notch |
The key is first and foremost making sure everything is exactly symmetrical with respect to the 3 roller tracks.
For those of you who already screwed up your variators, i'll be shipping out some 'oversized' rollers as soon as i can test them. Hopefully we can save the variators.
Wednesday, June 9, 2010
Test Dummies needed!

Yeah, finally came up with a nifty solution to the 'Magnum- maxi- exhaust bracket' issue... If you're rocking a magnum and want to try out my new bracket thinger, shoot me an email.
I'm looking for people who will actually put miles on these things, preferrably with estoril's (like heavy pipes) but its more important they get beat on.
Hopefully this will prevent the untimely end of thousands of poor cylinders from broken studs/air leaks/warping... etc.
Friday, May 7, 2010
Spring time- so busy now!
It sucks I haven't been able to update this in awhile, but sadly, most of what I'm working on falls under the umbrella of semi-classified. I'm back at my old job doing product testing at MSOE, so my free time has completely disappeared, I'm spending a lot of time doing some repair work that has been haunting me all winter, we're getting ready to move, so i'm packing up the shop and getting rid of junk, and most importantly I'm finally getting more parts off the ground and into production. All my cash and time have been tied up with product testing and development lately, but it should start paying off.
If you're waiting on machine work, I'm sorry, things are crazy busy right now, and the heads, kits, etc. are on the back burner while i try to get some products developed. Its amazing how much time and effort goes into producing something from an idea, to prototyping, testing, refinement, production, etc etc. I'm committed to producing the finest quality, made-in-america high performance moped parts, and its very time consuming, but hang in there folks. Some really great stuff is on its way.
If you're waiting on machine work, I'm sorry, things are crazy busy right now, and the heads, kits, etc. are on the back burner while i try to get some products developed. Its amazing how much time and effort goes into producing something from an idea, to prototyping, testing, refinement, production, etc etc. I'm committed to producing the finest quality, made-in-america high performance moped parts, and its very time consuming, but hang in there folks. Some really great stuff is on its way.
Thursday, February 25, 2010
Cylinder compression ratio in two stroke engines
I wrote this post a few weeks back, but its currently about 2 pages and only halfway done. Even i dont want to read it, so i'll try to condense the knowledge and answer most of the questions i've been getting lately about combustion dynamics and compression, without boring the heck out of everyone.
Despite the fact that it contains no valves, and could basically be replaced with a flat slab of aluminum, the cylinder head in a two stroke engine has had an incredible amount of research done on it. The head geometry controls of the major factors influencing efficiency (power) of the engine: combustion pressure, and combustion geometry. The burning of fuel and air in the cylinder is basically a very fast chemical reaction. The laws governing speed of a reaction, imply a faster and more thorough burning of the fuel + air in the head, with a) more air velocity and b) more pressure=temperature=decrease in volume.
Quite simply put, the compression ratio creates a higher pressure in the cylinder when the spark plug fires, causing the flame to 'explode' with a lot more force, pushing down on the piston. This creates higher torque because of more force pushing on piston, but also requires more force to push the piston back up and compress the fuel air mix.
We calculate CR by taking the total volume (displacement plus head) and dividing that by the head volume alone. For a 70cc kit with a 7 cc head (stock 50cc) + gaskets ( 1-2 cc) it works out like (70+8)/8= 9.75:1.
PSI can be an indicator of compression ratio, but requires much tricker math to actually figure out CR. Other factors like ring sealing, port dimensions, pipes, intakes, etc, effect the PSI reading.
The 'squish band' affects the 'v' or velocity part of the equation. Air moving quickly has more energy and explodes faster. Imagine having a bowl of vinegar and dumping in baking soda. If you stir the heck out of it, it will fizz up much more violently. That is what is happening as the piston approaches the squish band. The quick decrease in volume will blast all the gasses into the hemispherical chamber around the spark plug at the same time, the violence of moving air speeds the reaction. Jennings and Bell reccomend the 40% of area- 7 deg taper method of sizing a squish band.
Because of the 'faster' flame in a high compression setup, ignition timing will have to be retarded. The ignition triggers and begins igniting the fumes before top dead center, to account for the time it takes to burn the air. When the everything burns faster, the max intensity of the explosion is at the wrong time and pushes the piston down as it comes up (knocking or pinging). This is exacerbated by a pipe, (or supercharger) which increases the pressure in the cylinder.
Sometimes the compression is just too high, the fuel ignightes without any spark, this is also problematic. Going to a higher octane fuel (only necessary in this condiditon) will allow you to continue to run the higher CR and pipe, otherwise you have to drop CR or go to a different pipe.
The 2 stroke gets more complicated also, because there is a huge hole (exhaust port) in the side of the cylinder. So even though on paper the compression ratio for identical 70cc cylinders, with different exhaust timings, will be the same, the holes in the side, and efficiency of exhaust porting will make their actual combustion pressure drastically different.
Finally, what are you looking for with your bike? The mods that mostly effect the final combustion pressure are: More aggressive intake porting= higher compression, more aggressive exhaust porting = lower compression, more radical pipe= higher compression at high rpm's when pipe hits.
If you switch to a higher compression head, and think you are detonating (sounds like rocks rattling in a can... and isn't your crankshaft) try to retard your timing a bit, see if your power improves. Some kits require so many base gaskets to clear a stock head, or small HC, that by the time all that gets put on there they actually have crummy compression, or a lack of bottom end from having all the ports shifted up. When the compression comes back, a bike that was tuned for different setup, can get thrown off. The detonating sound will be nastiest when you are really cramming on the pipe hard. If the timing doesn't fix it, and you're jetted correctly, and running premium gas and synthetic oil, then try putting in more head gaskets to drop compression a bit.
The cylinders that i've already made a lot of heads for (DR hobbit, MK65, and Polini) the compression ratios are just about figured out, but there is a lot of improvement for specific setups. Knowing what to look for makes it a lot easier to fine tune compression with head gaskets, and play with squishin' dynamics.
Friday, February 19, 2010
Mid-winter update
As indicated by my previous post, i've been busy as heck. I'm trying to get a bunch of projects finished up over my 'quarter break' coming up at the end of the month here, because next quarter i'm headed back to MSOE more-fuller-time with 2 or 3 classes, and it looks like i'm headed back to my other day job too, so my moped time will be shut down for about 3 months.
I've got three major projects I'd like to get into 'production' state by then, so I can sit back and coast, but its put my personal bikes on hold. I figured, in the spirit of Terry Dean's helming of MotoMatic Blog, i'd cruise around the shop today with a camera and take some teaser photos of what i've been up to.
I've got three major projects I'd like to get into 'production' state by then, so I can sit back and coast, but its put my personal bikes on hold. I figured, in the spirit of Terry Dean's helming of MotoMatic Blog, i'd cruise around the shop today with a camera and take some teaser photos of what i've been up to.
Vespa cylinders! 
100SL2 yamaha project, for a customer, pretty rad bike

Ewwww... four stroke... my CL100 racebike for the Lake Erie Loop this spring. thats got a big 'in progress' sticker on it. 
What's this all about?
Exiting things to come..
Tuesday, February 16, 2010
Busy
Holy cow, this blog is going down in flames. I'm sorry, i've been too busy to post, but there are a lot of fancy things in the works. Sometimes it seems like the amount of real mopeds v. internet mopeds is inversely proportional.
Tuesday, January 26, 2010
Ciao FAIL
On wednesday, i was bored, and still frustrated with not having fixed the leakage issue on the ciao, so Alex, Joel, Jimmy and I tore it apart again (I can get the whole engine out in about 7 minutes now, most of that is removing the pipe) And I was finally able to figure out what was going on. In addition to the Decomp valve still leaking quite a bit, It appeared that when I used the face mill on the cylinder, It cut unevenly where it caught on the edge of the broken off fin. I should have broken or ground that fin off to start with, but you live and learn, eh.
Back in the machine shop, I took the cylinder and lined it up in the lathe, clamping the cylinder skirt. I was in a bit of a hurry to finish it up, and forgot my rule about doing this sort of thing... you have to run a piston inside the skirt or it will break the skirt off. I just had to take a few .001's off, so i wasn't too concerned, but when i started up the mill, some boner had left the feed engaged and right away the tool ground into the face of the cylinder and did this:

What a buzzkill.
Back in the machine shop, I took the cylinder and lined it up in the lathe, clamping the cylinder skirt. I was in a bit of a hurry to finish it up, and forgot my rule about doing this sort of thing... you have to run a piston inside the skirt or it will break the skirt off. I just had to take a few .001's off, so i wasn't too concerned, but when i started up the mill, some boner had left the feed engaged and right away the tool ground into the face of the cylinder and did this:
What a buzzkill.
I also went ahead and took the head down a couple .001's, which was probably a bad idea because now the extra tall piston i made is hitting, so i'll have to machine that stupid thing down again.  Yeesh, look at that nasty decomp, no wonder it was leaking, carbon and gunk all over...
Oh well, thats mopeds, should have left well enough alone when I had the chance. It looks like the cylinder will be fine with the skirt broken off, but if it eats it, I'm on the lookout for a new stock vespa cylinder. Anybody got one they'd like to get rid of? I've got a parts grande lined up, but i'm pretty sure thats a 10mm pin bike, so i'd rather not back track and rebuild another whole engine.
The good news is, break-in appears to be going well. I was concerned about re-using the old rings, but i cleaned them up with a little sand paper, and re-honed, and it looks like they are sealing really well. Given the wierd compression issues, i was worried they hadn't sealed, but this pic says it all:
The transfers also seem to be pretty well matched, the burn pattern on the piston is a little bit dark, but i'm 99% sure thats because of the wicked air leak causing things to run a bit hot. 
You can see on the piston the hot spot from the decomp valve leaking (also perhaps because of the wierd head shape around the decomp) and there is a big black mark where the head wasn't sealing that well. Hopefully cleaning the decomp again and fixing the sealing issue will take care of my shitty low-end and maybe even 'fix' the misfire situation.
Thursday, January 14, 2010
Mysteries of the universe. of mopeds.
Recently I discovered the library.
Rediscovered, is more like it really, I used to spend a lot of time in Eau Claire's LE Phillips Memorial Library reading and perusing all sorts of interesting things, but since coming to MSOE and signing my life over to the forces of homework, lab reports, and other such nonsense, I haven't really had time to waste on fiction. My dynamometer research got me back in the MSOE library where I found the amazing and mysterious TJ section. Titles like 'The design and development of 2-stroke engines' have completely rocked my world and dominated the last few weeks with knowledge I had, until lately, just grasped at.
In the upcoming weeks, I'll be spending as much free time as i can spare reading and distilling all this crazy knowledge, for you, my lovely readers. I just had the bomb of knowledge dropped on me in a big way, not to mention a lot of orders for machine work, and some interest in some of my other lesser-discussed projects, so it might take me awhile to dig out, but trust me, it will be well worth it.
Also, in the world of the ciao... massive head leakage, i think it has a lot to do with the decomp valve which i suspected was leaky-weeky, top speed so far has been a shy over 42, but low end is miserable, and compression is very low. I'll have this written up also as i get a 'round tuit' 
Friday, January 8, 2010
Moped tuner/machinist for hire.
After a few recent conversations, It has occurred to me that I'm not the best self-promoter or businessman. Its apparently unclear here and other places I post my knowledge, that I do moped work for-hire. I spent the summer doing repair work trying to pay the bills, and since I'm still under-employed, I've got a lot of time to hang out in the workshop and make things faster.
Stock-cylinder porting: $50, you specify performance characteristics, I compute ideal port map. Jobs requiring additional machining extra.
Dellorto SHA or Bing carbureator boring, up to 7/8" (15.8mm): $20, plus any time spent cleaning/disassembling carb. This is performed to a mirror finish with a boring reamer, I will also remove and modify dellorto emulsion tubes.
Case-matching: $40 + gaskets. Shown is metrakit E50 with additional transfer porting.
My standard shop rate is $30/hr, for just about anything. Fabrication, welding, custom parts, adapters, manifolds, exhausts, if you've read the blog you know what I can do.
In addition to that, some services I commonly perform have flat-rate pricing:
Cylinder head milling: $25/ on-center spark plugs, $35/ off center spark plugs, $30/ Garelli and Minarelli heads with recessed sealing faces. All heads are custom machined for a specific bore and compression ratio, with 2-angle squish band.
 |
| From Machined Heads |
Stock-cylinder porting: $50, you specify performance characteristics, I compute ideal port map. Jobs requiring additional machining extra.
Dellorto SHA or Bing carbureator boring, up to 7/8" (15.8mm): $20, plus any time spent cleaning/disassembling carb. This is performed to a mirror finish with a boring reamer, I will also remove and modify dellorto emulsion tubes.
Case-matching: $40 + gaskets. Shown is metrakit E50 with additional transfer porting.
 |
| From Metrakit Nate B |
My gmail address works well for contacting me. I turn stuff around pretty quick, usually a week or less, but it depends on how busy I am. Email and discuss things with me, everything is custom, so Its my priority that its done just right for your build.
Subscribe to:
Posts (Atom)