Wednesday, July 28, 2010

More new products!

I've been flogging the hell out of my poor little kidnapped Keebler Elves and managed to squeeze out a few new products I'm super proud of. Both should be top sellers in stock at Treatland soon.

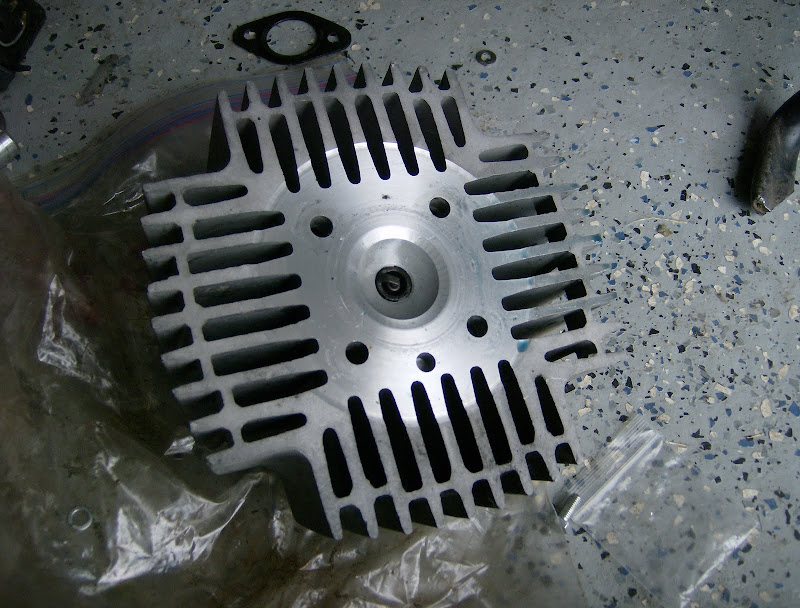
First, the 'treats reed kit' aka 'tomos alukit machined for puch exhaust flange' has a major design flaw, the deck height is about +3-4 mm from the top of the piston. Ohnoes! Low compression to be sure, which is a major bummer for a kit with awesome bottom end. I built one of these a few months back and tried a couple different things to get it in spec, but the easiest solution i found was a super-duper high compression head.
From Puch 'treats' reed kit - Noah Bern


These are machined from puch Magnum heads, which fit the fins relatively close
From Puch 'treats' reed kit - Noah Bern


Not perfect, but the performance increase is noticeable. Starts much better, timing is more predictable, and it feels like it has way better torque, but that's hard to claim without a dyno. Anyhow, about 4 of these are in testing and have been running great.

That build also made me re-think a big problem area for owners of magnums. Over the years I've tried a few different ways to mount maxi exhausts onto magnums, including flat brackets with bends, different shims, etc, and nothing has been satisfactory in terms of looking clean, simple, and fitting a variety of different bikes, kits, and pipes. Finally I came up with this little guy:
From Puch 'treats' reed kit - Noah Bern


Simple, elegant, and the test models seem to fit most magnums. The only one that had complications, i believe was crashed because the pipe was all chewed up and the arm was bent.


The final version is much more professional looking and entirely made of stainless steel and aluminum, with plated grade 5 and grade 8 fasteners. I dont have a picture handy, but there will be one up on treatland when they get them in.

Thursday, June 17, 2010

Honda hobbit variator 'notching'

I started making hobbit weights a few years ago for friends and such, because there is really nothing on the aftermarket, and the stock weights are hard steel, which is tough to modify, and the chincy little plastic nubs on them fall off. I started with a few different metals and ended up using a very hard acetal polymer.

I have since learned other moped wizard guru types have been doing this much longer than i have, and came to the same conclusions. I've sold a few through Treatland now, of my best design and manufacturing methods, and there have been some complaints. One of the first test sets i made, had the same problem. The weight pushes out too far and gets pinched, with the sharp steel outer plate digging into the plastic and jamming it in fully variated position. Some R&D confirmed this was due to people improperly 'notching' their variators, so I made a note to doccument it the next time i did it. Peter's Blog has a ton of great info on hopping up Hobbits, including info on variator notching. You should read all of that first, but in how it directly relates to 'Moped Factory' Slick Rick Rollers, I would like to add a bit of detail.

The very important first step in the process is carefully measuring a line around the variator 10 mm from the outside edge. I've done this with a caliper, but if you dont have one a wrench might work well. the exact number isn't super precise (+/- .2 maybe) but making sure its even will keep things balanced and make sure it variates precisely.
From Hobbit Vario Notch


Tape off the line so you can see it and make sure its dead-on. Then get your dremel cut-off wheel out and start cutting just above the taped edge, along where the roller 'track' goes through.
From Hobbit Vario Notch


Next, cut the rest of the window out, along the edges of the roller 'track'. I use the hacksaw because its way faster than the stupid dremel wheels, but maybe you're turbo lazy or something. Either way, cut that out of there.
From Hobbit Vario Notch


You will probably be left with a little material in the corners holding it in, a quick tap tap taparooo with the hammer will bust those chunks out.
Before:
From Hobbit Vario Notch


After:
From Hobbit Vario Notch


This is what it should look like from the inside. Note the fact that the cut edge sticks above the top of the roller track by about 3 mm. This is about the thickness of the cut area... coincidence? i think not!
From Hobbit Vario Notch


Now you just take your grinding bit and extend the ramp through the wall of the variator.
From Hobbit Vario Notch
The key is that you aren't grinding down the original ramp at all, just extending it. What you dont want to do is cut off flush with the top edge of the ramp, and then grind it down, you are changing the clearance between the two ramp surfaces, and now the rollers dont fit. Maybe i'll do a diagram of this later.

When you're finished it should look like this: (or maybe even prettier, if you want to go nuts with fine bits... not that important)
From Hobbit Vario Notch


The key is first and foremost making sure everything is exactly symmetrical with respect to the 3 roller tracks.

For those of you who already screwed up your variators, i'll be shipping out some 'oversized' rollers as soon as i can test them. Hopefully we can save the variators.

Wednesday, June 9, 2010

Test Dummies needed!


Yeah, finally came up with a nifty solution to the 'Magnum- maxi- exhaust bracket' issue... If you're rocking a magnum and want to try out my new bracket thinger, shoot me an email.

I'm looking for people who will actually put miles on these things, preferrably with estoril's (like heavy pipes) but its more important they get beat on.

Hopefully this will prevent the untimely end of thousands of poor cylinders from broken studs/air leaks/warping... etc.

Friday, May 7, 2010

Spring time- so busy now!

It sucks I haven't been able to update this in awhile, but sadly, most of what I'm working on falls under the umbrella of semi-classified. I'm back at my old job doing product testing at MSOE, so my free time has completely disappeared, I'm spending a lot of time doing some repair work that has been haunting me all winter, we're getting ready to move, so i'm packing up the shop and getting rid of junk, and most importantly I'm finally getting more parts off the ground and into production. All my cash and time have been tied up with product testing and development lately, but it should start paying off.

If you're waiting on machine work, I'm sorry, things are crazy busy right now, and the heads, kits, etc. are on the back burner while i try to get some products developed. Its amazing how much time and effort goes into producing something from an idea, to prototyping, testing, refinement, production, etc etc. I'm committed to producing the finest quality, made-in-america high performance moped parts, and its very time consuming, but hang in there folks. Some really great stuff is on its way.

Thursday, February 25, 2010

Cylinder compression ratio in two stroke engines

I wrote this post a few weeks back, but its currently about 2 pages and only halfway done. Even i dont want to read it, so i'll try to condense the knowledge and answer most of the questions i've been getting lately about combustion dynamics and compression, without boring the heck out of everyone.


Despite the fact that it contains no valves, and could basically be replaced with a flat slab of aluminum, the cylinder head in a two stroke engine has had an incredible amount of research done on it. The head geometry controls of the major factors influencing efficiency (power) of the engine: combustion pressure, and combustion geometry. The burning of fuel and air in the cylinder is basically a very fast chemical reaction. The laws governing speed of a reaction, imply a faster and more thorough burning of the fuel + air in the head, with a) more air velocity and b) more pressure=temperature=decrease in volume.

Quite simply put, the compression ratio creates a higher pressure in the cylinder when the spark plug fires, causing the flame to 'explode' with a lot more force, pushing down on the piston. This creates higher torque because of more force pushing on piston, but also requires more force to push the piston back up and compress the fuel air mix.

We calculate CR by taking the total volume (displacement plus head) and dividing that by the head volume alone. For a 70cc kit with a 7 cc head (stock 50cc) + gaskets ( 1-2 cc) it works out like (70+8)/8= 9.75:1.

PSI can be an indicator of compression ratio, but requires much tricker math to actually figure out CR. Other factors like ring sealing, port dimensions, pipes, intakes, etc, effect the PSI reading.

The 'squish band' affects the 'v' or velocity part of the equation. Air moving quickly has more energy and explodes faster. Imagine having a bowl of vinegar and dumping in baking soda. If you stir the heck out of it, it will fizz up much more violently. That is what is happening as the piston approaches the squish band. The quick decrease in volume will blast all the gasses into the hemispherical chamber around the spark plug at the same time, the violence of moving air speeds the reaction. Jennings and Bell reccomend the 40% of area- 7 deg taper method of sizing a squish band.

Because of the 'faster' flame in a high compression setup, ignition timing will have to be retarded. The ignition triggers and begins igniting the fumes before top dead center, to account for the time it takes to burn the air. When the everything burns faster, the max intensity of the explosion is at the wrong time and pushes the piston down as it comes up (knocking or pinging). This is exacerbated by a pipe, (or supercharger) which increases the pressure in the cylinder.

Sometimes the compression is just too high, the fuel ignightes without any spark, this is also problematic. Going to a higher octane fuel (only necessary in this condiditon) will allow you to continue to run the higher CR and pipe, otherwise you have to drop CR or go to a different pipe.

The 2 stroke gets more complicated also, because there is a huge hole (exhaust port) in the side of the cylinder. So even though on paper the compression ratio for identical 70cc cylinders, with different exhaust timings, will be the same, the holes in the side, and efficiency of exhaust porting will make their actual combustion pressure drastically different.

Finally, what are you looking for with your bike? The mods that mostly effect the final combustion pressure are: More aggressive intake porting= higher compression, more aggressive exhaust porting = lower compression, more radical pipe= higher compression at high rpm's when pipe hits.

If you switch to a higher compression head, and think you are detonating (sounds like rocks rattling in a can... and isn't your crankshaft) try to retard your timing a bit, see if your power improves. Some kits require so many base gaskets to clear a stock head, or small HC, that by the time all that gets put on there they actually have crummy compression, or a lack of bottom end from having all the ports shifted up. When the compression comes back, a bike that was tuned for different setup, can get thrown off. The detonating sound will be nastiest when you are really cramming on the pipe hard. If the timing doesn't fix it, and you're jetted correctly, and running premium gas and synthetic oil, then try putting in more head gaskets to drop compression a bit.

The cylinders that i've already made a lot of heads for (DR hobbit, MK65, and Polini) the compression ratios are just about figured out, but there is a lot of improvement for specific setups. Knowing what to look for makes it a lot easier to fine tune compression with head gaskets, and play with squishin' dynamics.

Friday, February 19, 2010

Mid-winter update

As indicated by my previous post, i've been busy as heck. I'm trying to get a bunch of projects finished up over my 'quarter break' coming up at the end of the month here, because next quarter i'm headed back to MSOE more-fuller-time with 2 or 3 classes, and it looks like i'm headed back to my other day job too, so my moped time will be shut down for about 3 months.
I've got three major projects I'd like to get into 'production' state by then, so I can sit back and coast, but its put my personal bikes on hold. I figured, in the spirit of Terry Dean's helming of MotoMatic Blog, i'd cruise around the shop today with a camera and take some teaser photos of what i've been up to.


Vespa cylinders!


100SL2 yamaha project, for a customer, pretty rad bike


Ewwww... four stroke... my CL100 racebike for the Lake Erie Loop this spring. thats got a big 'in progress' sticker on it.


What's this all about?


Exiting things to come..

Tuesday, February 16, 2010

Busy

Holy cow, this blog is going down in flames. I'm sorry, i've been too busy to post, but there are a lot of fancy things in the works. Sometimes it seems like the amount of real mopeds v. internet mopeds is inversely proportional.